CSS stands for Cascading Style Sheets. CSS provides a way to apply different sets of formatting styles to the same HTML document. You could use them, for example, to make the text in a HTML document larger and more easily readable by vision impaired visitors, without effecting what vistors with normal vision see.
There are HUNDREDS of different CSS properties that you can change to have a wide variety of effects on the individual behavior and appearance of your HTML elements. There is no hope of trying to describe all of them here so we will simply explore a few of the most commonly used properties and selectors. For a full reference for ALL the CSS properties please click here for the excellent W3Schools CSS reference.
How do you apply CSS styling?
Definitions and terminology
- HTML web page or just web page
Typically they are text files that have the extension .html or .htm. The you open these file types in your web browser, it reads the HTML instructions and 'renders' the web page.
What is 'scope'
Well no doubt you are familiar with the concept of scope when it comes to writing some sort of organisational report or proposal. For example, the scope of your report might be limited to the next 5 yeasr only or to the VIC operation but not the national operation. Scope in the context of CSS is somewhat similar. The scope of your CSS styling can apply:
- To a single instance of a HTML tag (one off) in a particular HTML web page.
- A set of styles that apply to one or more HTML elements on a particular HTML web page.
- A 'global' set of styles that can apply to any HTML element in any HTML web page in the entire website.
Inline CSS
This is used for 'one off' styling of particular HTML elements within the current web page.
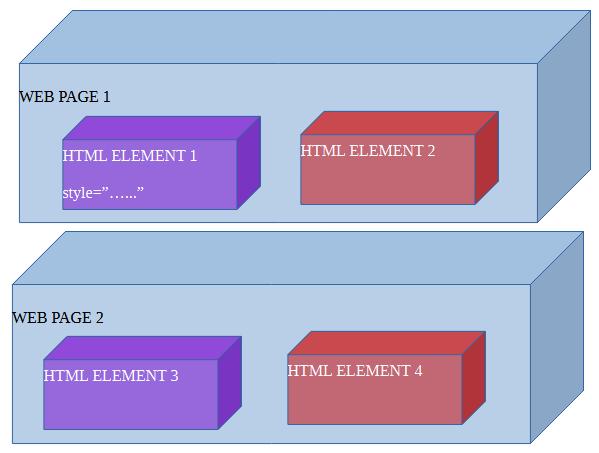
HTML Elements 2, 3 and 4 cannot 'see' HTML element 1's inline styles. Those inline styles are said to be
'out of scope' for HTML elements 2, 3 and 4.
You insert your CSS styling into the 'style' property between the double quotes, e.g. <div style="background-color:blue;">...</div>. The 'style' property is one of the generic HTML tag properties that you can apply to ANY HTML element.
<style> / </style> tags
This is used for styling of one or more elements but in the current web page only. HTML elements on other web pages
CANNOT 'see' the CSS styles between the <style>...</style> on other web pages.
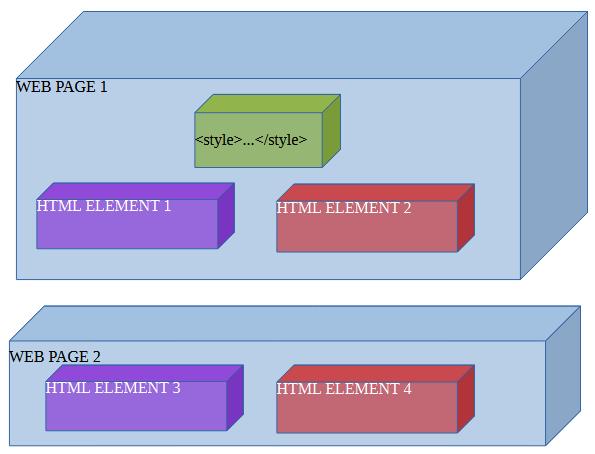
HTML Elements 2 and 3 can 'see' your styles you have put between the <style> tags at the top of your web page. They
are said to be 'in scope' for HTML elements 2 and 3.
However HTML elements 3 and 4 cannot 'see' the styles on HTML page 1. The styles on web page 1 are said to be 'out of scope' for HTML elements 3 and 4 on web page 2.
Remember the basic tag structure of a HTML document? Click here if you need to read it again. The style tags are typically located within the head tags, like this:
<!DOCTYPE html PUBLIC "-//W3C//DTD XHTML 1.0 Transitional//EN" "http://www.w3.org/TR/xhtml1/DTD/xhtml1-transitional.dtd">
<html xmlns="http://www.w3.org/1999/xhtml">

        <head>
                <meta content="text/html; charset=utf-8" http-equiv="Content-Type" />
                <title>Untitled 1</title>
                <style>
                        ...
                </style>
        </head>

        <body>

        </body>

</html>
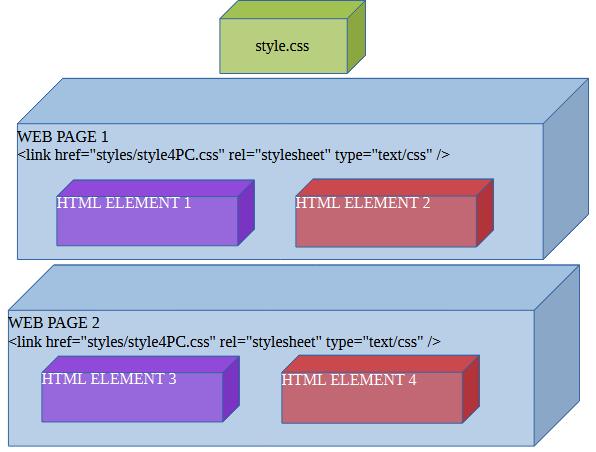
The file style.css
This is used for 'global' or 'god' styling of one or more HTML elements across multiple HTML web pages. MS Expression web likes to use the file name 'style.css' for this but you do not have stick this this file name if you do not want to. You could two style sheets in principle - 'StyleVisionImpaired.css' and StyleNormalVision.css' for example. It is up to you what filename you give your style sheet(s). MS Expression Web also likes to store your 'style.css' file in a sub-folder named 'styles'. But again you can store then in any sub-folder you chose, or not store them in any sub-folder at all.
However every HTML web page in which you want to use your style sheet(s) MUST have this line of HTML code in them:
<link href="styles/style4PC.css" rel="stylesheet" type="text/css" />
You can read all bout the HTML <Link ... > tag here if you wish to. Or just do what i do - copy and paste the text from another HTML web page. The link tag must correctly tell the web browser what sub-folder (or not) where it will find your .css file, and its correct filename.
As long as you include an appropriate <link ... > tag in both web pages 1 and 2 then all the styles you put in
your style.css then they are 'in scope' for both web pages 1 and 2, and HTML elements 1, 2, 3 and 4.
What is the purpose of this 'scoping'?
The purpose of all this is to allow you you to 're-use' your CSS styling across multiple elements and multiple web pages, without having to tyoe the same CSS styling over and over again for individual elements and individual HTML web pages.
But the system ALSO allows you to 'compartmentalise' your CSS styling. For example, if web page 1 has CSS style that you don't need use in web page 2 then you put them between the <style> tags OF web page 1. If you have styles that you need to apply to a particular HTML element and other then use inline styling (style="...").
Via ID selectors
This method employs the use of the HTML tag property 'id' as the means of selecting those HTML elements to which a set of CSS styles will be applied. For example:
Remember the HTML tag property 'id' can be applied to ANY type of HTML element - it is generic property.
<div id="green_div">######</div>
<div id="other_div">$$$$$$</div>
<div id="green_div">@@@@@@</div>
Then, either between the <style">...</style">vin your HTML web page or in 'style.css' you do this:

	#green_div

	{

	          background-color: green;
	          border-style: solid;
	          border-color: red;
	          border-width: thick;
	}

	And here are the results:
Notice that only the top and bottom divs (with id="green_div") have green backgrounds and thick red borders. The middle div (with id="other_div" and text content "$$$$$$") does not.
However I recomend against using this technique as it can cause problems if you use Javascript in your web page. Particularly with the Javascript function document.getElementById("unique_element_id"). It requires that the HTML element you are trying to 'get' has a unique name for its 'id' property. Using the CSS id selector requires mutiple HTML elements to have a shared name for their 'id' property. Hence document.getElementById("unique_element_id") simply will not work as you expect it to.
Via class selectors
This is a better way of appying CSS styles to multiple HTML elements.
	<div class="green_div big_white_text">######</div>
	<div class="other_div">$$$$$$</div>
	<div class="green_div">@@@@@@</div>
	You utilise the 'class' property instead and specify one or more a unique 'class' names. This method has a major
	advantage over the 'id' method in that you can apply multiple class names with different sets of CSS styles as in
	this example.
Then, either between the <style">...</style"> in your HTML web page or in 'style.css' you do this:

	.green_div

	{

	          background-color: green;
	          border-style: solid;
	          border-color: red;
	          border-width: thick;
	}
	.big_white_text

	{

	          color: white;
	          font-size: xx-large;
	}

	And here are the results:
Via tag selectors
You can also apply selectively apply CSS styles via tag selectors. You use tag selectors if you want your styles applied to every single isntance of any particular tag.
	<span>######</span>
	<span>$$$$$$</span>
	<span>@@@@@@</span>

	Notice that neither the 'id' or 'class' properties are specified for these spans.
And between the between the <style">...</style"> in your HTML web page or in 'style.css' you do the following with the tag name you want the styles applied to.###### $$$$$$ @@@@@@
span { background-color: green; border-style: solid; border-color: red; border-width: thick; color: white;
font-size: xx-large; } And here are the results:
All 3 HTML elements are spans therefore all three have green backgrounds, thick red borders and big white text.
And you have now learned how to use your first six CSS properties. MS Expression Web will show you a popup lists of CSS properties you can use, and popup lists of values you can apply to each attribute, as you type within style="..." and the <style>...</style> tags.
Specifying colors
There are many named colors that you can apply to the 'background-color' and 'color' properties and you can read about them here. Or you can invent your own colors via hex values, rgb(...) and rgba(...), hls(...) and hlsa(...). Simple named colours are the most convenient to use.
Borders
You have VERY fine control over borders so let's look at some quick examples. And you can read all about CSS borders by clicking here.
border-style
	<div style="border-style:solid;width:100px;">XXXXXXX</div>
	<div style="border-style:dotted;width:100px;">XXXXXXX</div>
	<div style="border-style:dashed;width:100px;">XXXXXXX</div>
	<div style="border-style:double;width:100px;">XXXXXXX</div>
	<div style="border-style:inset;width:100px;">XXXXXXX</div>
	<div style="border-style:outset;width:100px;;">XXXXXXX</div>
	<div style="border-style:ridge;width:100px;">XXXXXXX</div>
	<div style="border-style:groove;width:100px;;">XXXXXXX</div>
	The results are:
Or...
	<div style="border-left-style:solid;border-top-style:dotted;border-right-style:dashed;border-bottom-style:double;width:100px;">XXXXXXX</div>
	<div style="border:solid dotted dashed double;width:100px;">XXXXXXX</div>
	The results are:
border-width
DEFAULT VALUE: "thin"
	<div style="border-style:solid;border-width:thin;width:100px;">XXXXXXX</div>
	<div style="border-style:solid;border-width:medium;width:100px;">XXXXXXX</div>
	<div style="border-style:solid;border-width:thick;width:100px;">XXXXXXX</div>
	<div style="border-style:solid;border-width:20px;width:100px;">XXXXXXX</div>
	The results are:
border-color
DEFAULT VALUE: "black"
	<div style="border-style:solid;border-width:medium;border-color:red;width:100px;">XXXXXXX</div>
	<div style="border-style:solid;border-width:medium;border-color:green;width:100px;">XXXXXXX</div>
	<div style="border-style:solid;border-width:medium;border-color:blue;width:100px;">XXXXXXX</div>
	The results are:
border-radius
DEFAULT VALUE: "0px" (sharp corners)
	<div style="border-style:solid;border-width:medium;border-color:red;border-radius:3px;width:100px;">XXXXXXX</div>
	<div style="border-style:solid;border-width:medium;border-color:green;border-radius:5px;width:100px;">XXXXXXX</div>
	<div style="border-style:solid;border-width:medium;border-color:blue;border-radius:10px;width:100px;">XXXXXXX</div>
	<div style="border-style:solid;border-width:medium;border-color:blue;border-radius:20px;width:100px;">XXXXXXX</div>
	The results are:
Shorthand
	<div style="border:solid thin red;width:100px;">XXXXXXX</div>
	<div style="border:dashed thin red;width:100px;">XXXXXXX</div>
	<div style="border:solid thin red;width:100px;">XXXXXXX</div>
	<div style="border:solid medium red;width:100px;">XXXXXXX</div>
	<div style="border:solid thin red;width:100px;">XXXXXXX</div>
	<div style="border:solid thin blue;width:100px;">XXXXXXX</div>
	The results are:
display
This CSS attribute controls how an element is displayed on the web page. Note that there are many other values that you can apply to this CSS attribute, than those detailed here. But those other values are really only suited for advanced web programmers. But you can read about all of the values by clicking here if you wish.
DEFAULT VALUE FOR DIV & DIV TYPE ELEMENTS: "block"
DEFAULT VALUE FOR SPAN & SPAN TYPE ELEMENTS: "inline"
"block"
	<div style="background-color:blue;width:100px;height:100px;display:block;">XXXXXXX</div>
	<div style="background-color:green;width:100px;height:100px;display:block;">XXXXXXX</div>
	<div style="background-color:red;width:100px;height:100px;display:block;">XXXXXXX</div>
	The results are:
"none"
	<div style="background-color:blue;width:100px;height:100px;display:block;">XXXXXXX</div>
	<div style="background-color:green;width:100px;height:100px;display:none;">XXXXXXX</div>
	<div style="background-color:red;width:100px;height:100px;display:block;">XXXXXXX</div>
	The results are:
Note, that if you specify "none" for the 'display' attribute, then the element disappears entirely from the web page. You can use this attribute to temporarily hide an element.
"inline-block"
	<div style="background-color:blue;width:100px;height:100px;display:inline-block;">XXXXXXX</div>
	<div style="background-color:green;width:100px;height:100px;display:inline-block;">XXXXXXX</div>
	<div style="background-color:red;width:100px;height:100px;display:inline-block;">XXXXXXX</div>
	The results are:
"inline"
	<div style="background-color:blue;width:100px;height:100px;display:inline;">XXXXXXX</div>
	<div style="background-color:green;width:100px;height:100px;display:inline;">XXXXXXX</div>
	<div style="background-color:red;width:100px;height:100px;display:inline;">XXXXXXX</div>
	The results are:
Note, that if you specify that an element should be displayed 'inline' then you can no longer control its width and height. They are controlled exclusively by the elements' contents.
Fonts
font-family
There are several generic fonts that all web browsers are likely to have 'built in'. And you can read about them and the 'font-family' attribute by clicking here.
However there are thousands of web fonts available from Google. Click here to browse through some of them. Each one provides you with the HTML code that you need to paste into your HTML web page in order to use them.
	<p style="font-family:Arial, Helvetica, sans-serif">Hello World</p>
	<p style="font-family:Cambria, Cochin, Georgia, Times, 'Times New Roman', serif">Hello World</p>
	<p style="font-family:'Courier New', Courier, monospace">Hello World</p>
	<p style="font-family:'Franklin Gothic Medium', 'Arial Narrow', Arial, sans-serif">Hello World</p>
	<p style="font-family:'Lucida Sans', 'Lucida Sans Regular', 'Lucida Grande', 'Lucida Sans Unicode', Geneva, Verdana, sans-serif">Hello World</p>
	<p style="font-family:Georgia, 'Times New Roman', Times, serif">Hello World</p>
	<p style="font-family:'Gill Sans', 'Gill Sans MT', Calibri, 'Trebuchet MS', sans-serif">Hello World</p>
	<p style="font-family:Impact, Haettenschweiler, 'Arial Narrow Bold', sans-serif">Hello World</p>
	And here are the results:
Hello World
Hello World
Hello World
Hello World
Hello World
Hello World
Hello World
Hello World
font-weight
This attribute controls how thick the text appears. You can read more about it by clicking here.
	<p style="font-weight:normal">Hello World</p>
	<p style="font-weight:bold">Hello World</p>
	<p style="font-weight:100">Hello World</p>
	<p style="font-weight:200">Hello World</p>
	<p style="font-weight:300">Hello World</p>
	<p style="font-weight:400">Hello World</p>
	<p style="font-weight:500">Hello World</p>
	<p style="font-weight:600">Hello World</p>
	<p style="font-weight:700">Hello World</p>
	<p style="font-weight:800">Hello World</p>
	<p style="font-weight:900">Hello World</p>
	And here are the results:
Hello World
Hello World
Hello World
Hello World
Hello World
Hello World
Hello World
Hello World
Hello World
Hello World
Hello World
font-style
This attribute controls the font style, e.g. nornal of italic. You can read more about it by clicking here.
	<p style="font-style:normal">Hello World</p>
	<p style="font-style:italic">Hello World</p>
	<p style="font-style:oblique">Hello World</p>
	And here are the results:
Hello World
Hello World
Hello World
font-size
This attribute controls the font size. You can read more about it by clicking here.
	<p style="font-size:xx-small;">Hello World</p>
	<p style="font-size:x-small;">Hello World</p>
	<p style="font-size:small;">Hello World</p>
	<p style="font-size:medium;">Hello World</p>
	<p style="font-size:large;">Hello World</p>
	<p style="font-size:x-large;">Hello World</p>
	<p style="font-size:xx-large;">Hello World</p>
	<p style="font-size:40px;">Hello World</p>
	<p style="font-size:60px;">Hello World</p>
	And here are the results:
Hello World
Hello World
Hello World
Hello World
Hello World
Hello World
Hello World
Hello World
Hello World
color
This attribute sets the text color for any HTML element. You can read more about it here.
	<p style="color:red;">Hello World</p>
	<p style="color:green;">Hello World</p>
	<p style="color:blue;">Hello World</p>
	<p style="color:cyan";>Hello World</p>
	<p style="color:magenta;">Hello World</p>
	<p style="color:yellow;">Hello World</p>
	<p style="color:black;">Hello World</p>
	<p style="color:grey;">Hello World</p>
	And here are the results:
Hello World
Hello World
Hello World
Hello World
Hello World
Hello World
Hello World
Hello World
position, left & top
These attributes are typically used in together to modify the position of an element on the screen. You can read more about this attribute by clicking here. The allowed values are thus:
static
If you specify this value then any 'top' and 'left' attributes you specify will be ignored. Click here to see an example.
fixed
If you specify this value then any 'top' and 'left' attributes you specify will be relative to the web browser window. Click here to see an example.
absolute
If you specify this value then any 'top' and 'left' attributes you specify will be relative to the element's parent position. Click here to see an example.
Sticky
If you specify this value then any 'top' and 'left' attributes you specify will be relative to the user's scroll position. Click here to see an example.
relative
If you specify this value then you can specify either negative values for 'top' and 'left', which move the element up and to the left from its default position. Or positive values, which move the element down and to the right from its default position. Here is and example.
No change in default position of the second div.
<div style="background-color:green;width:100px;height:100px;">XXXXXX</div>
<div style="background-color:blue;width:100px;height:100px;position:relative;top:0px;left:0px;">XXXXXX</div>
The second div is moved up and to the left by 20 pixels.
<div style="background-color:green;width:100px;height:100px;">XXXXXX</div>
<div style="background-color:blue;width:100px;height:100px;position:relative;top:-20px;left:-20px;">XXXXXX</div>
The second div is moved down and to the right by 20 pixels.
<div style="background-color:green;width:100px;height:100px;">XXXXXX</div>
<div style="background-color:blue;width:100px;height:100px;position:relative;top:20px;left:20px;">XXXXXX</div>
Alignment
text-align
DEFAULT VALUE: "left"
	<div style="background-color:blue;color:white;margin:5px;width:200px;height:100px;">XXXXXX</div>
	<div style="background-color:blue;color:white;margin:5px;width:200px;height:100px;text-align:left;">XXXXXX</div>
	<div style="background-color:blue;color:white;margin:5px;width:200px;height:100px;text-align:center;">XXXXXX</div>
	<div style="background-color:blue;color:white;margin:5px;width:200px;height:100px;text-align:right;">XXXXXX</div>
vertical-align
DEFAULT VALUE: "middle"
If you are trying to align plain text inside a div, as in the example below, then you must also specify a value for the 'line-height' attribute. Otherwise 'vertical-align' will have no effect on the text. In this example the 'line-height' is the same as the 'height' or 100 pixels ('100px').
	<div style="background-color:blue;color:white;margin:5px;width:200px;height:100px;">XXXXXX</div>
	<div style="background-color:blue;color:white;margin:5px;width:200px;height:100px;vertical-align:top;line-height:100px;">XXXXXX</div>
	<div style="background-color:blue;color:white;margin:5px;width:200px;height:100px;vertical-align:middle;line-height:100px;">XXXXXX</div>
	<div style="background-color:blue;color:white;margin:5px;width:200px;height:100px;vertical-align:bottom;line-height:100px;">XXXXXX</div>
These examples represent simplest cases of using 'vertical-align', however there are other values you can use for this attribute. They are concerned with how text arranges itself vetically in relation to, for example, images in the middle of the text. You can read all about it and see other examples of its use by clicking here.
Margins & Padding
Margins are the spacing between a given HTML element and those above and below, and those to the left and to the right. Padding is the space between the 4 margins of the HTML element and any of is contents.
DEFAULT FOR MARGINS: 0px(pixels).
DEFAULT FOR PADDING: 0px(pixels).
You can read more about margins by clicking here and more about padding by clicking here.
You can specify both padding and margins in 3 different ways:
- SHORTHAND:
margin: 10px; padding:10px;
This way sets left, right, top & bottom margins and left, right, top & bottom padding via a single value, in this case 10px(pixels). - LONG HAND:
			     margin: 10px 10px 1
			     padding:10px 10px
			     margin: 10px 10px 10px
			     padding:10px 10px 10px
			     margin: 10px 10px 10px 10px;
			     padding:10px 10px 10px 10px;


			  	 This way sets left, right, top & bottom margins and left, right, top & bottom padding via 2 to 4 values,
			  	 in this case 10px(pixels). The order of the individual padding and margins is as follows:


			  	 padding: top right bottom left;

margin: top right bottom left; -
INDIDUALLY:
			     margin-left: 10px;
			     margin-right: 10px;
			     margin-top: 10px;
			     margin-bottom: 10px;


			     And...


			     padding-left: 10px;
			     padding-right: 10px;
			     padding-top: 10px;
			     padding-bottom: 10px;
No margins or padding
	<div style="display:inline-block;background-color:blue;color:white;width:200px;height:100px;">XXXXXX</div>
	<div style="display:inline-block;background-color:green;color:white;width:200px;height:100px;">XXXXXX</div>
	<div style="display:inline-block;background-color:red;color:white;width:200px;height:100px;">XXXXXX</div>
	<div style="display:inline-block;background-color:cyan;color:white;width:200px;height:100px;">XXXXXX</div>
	<div style="display:inline-block;background-color:purple;color:white;width:200px;height:100px;">XXXXXX</div>
	<div style="display:inline-block;background-color:magenta;color:white;width:200px;height:100px;">XXXXXX</div>
	<div style="display:inline-block;background-color:yellow;color:white;width:200px;height:100px;">XXXXXX</div>
	<div style="display:inline-block;background-color:navy;color:white;width:200px;height:100px;">XXXXXX</div>
	<div style="display:inline-block;background-color:maroon;color:white;width:200px;height:100px;">XXXXXX</div>
Margins at 40 pixels and no padding
	<div style="display:inline-block;background-color:blue;color:white;width:200px;height:100px;margin:40px;">XXXXXX</div>
	<div style="display:inline-block;background-color:green;color:white;width:200px;height:100px;margin:40px;">XXXXXX</div>
	<div style="display:inline-block;background-color:red;color:white;width:200px;height:100px;margin:40px;">XXXXXX</div>
	<div style="display:inline-block;background-color:cyan;color:white;width:200px;height:100px;margin:40px;">XXXXXX</div>
	<div style="display:inline-block;background-color:purple;color:white;width:200px;height:100px;margin:40px;">XXXXXX</div>
	<div style="display:inline-block;background-color:magenta;color:white;width:200px;height:100px;margin:40px;">XXXXXX</div>
	<div style="display:inline-block;background-color:yellow;color:white;width:200px;height:100px;margin:40px;">XXXXXX</div>
	<div style="display:inline-block;background-color:navy;color:white;width:200px;height:100px;margin:40px;">XXXXXX</div>
	<div style="display:inline-block;background-color:maroon;color:white;width:200px;height:100px;margin:40px;">XXXXXX</div>
Padding at 40 pixels and no margins
	<div style="display:inline-block;background-color:blue;color:white;width:200px;height:100px;padding:40px;">XXXXXX</div>
	<div style="display:inline-block;background-color:green;color:white;width:200px;height:100px;padding:40px;">XXXXXX</div>
	<div style="display:inline-block;background-color:red;color:white;width:200px;height:100px;padding:40px;">XXXXXX</div>
	<div style="display:inline-block;background-color:cyan;color:white;width:200px;height:100px;padding:40px;">XXXXXX</div>
	<div style="display:inline-block;background-color:purple;color:white;width:200px;height:100px;padding:40px;">XXXXXX</div>
	<div style="display:inline-block;background-color:magenta;color:white;width:200px;height:100px;padding:40px;">XXXXXX</div>
	<div style="display:inline-block;background-color:yellow;color:white;width:200px;height:100px;padding:40px;">XXXXXX</div>
	<div style="display:inline-block;background-color:navy;color:white;width:200px;height:100px;padding:40px;">XXXXXX</div>
	<div style="display:inline-block;background-color:maroon;color:white;width:200px;height:100px;padding:40px;">XXXXXX</div>
Note how the divs have been enlarged in order to accomodate the internal padding along all sides.
Overflow
Another important CSS attribute is 'overflow'. Or in other words, what happens to the contents of a HTML element if it does not fit within the boundaries of the element. You can read more about this CSS attribute by clicking here.
DEFAULT: visible.
overflow: visible;
<div style="display:block;background-color:black;color:white;width:400px;height:100px;overflow:visible;">

        Lorem Ipsum is simply dummy text of the printing and typesetting industry. Lorem Ipsum has been the industry's standard
        dummy text ever since the 1500s, when an unknown printer took a galley of type and scrambled it to make a type specimen
        book. It has survived not only five centuries, but also the leap into electronic typesetting, remaining essentially
        unchanged. It was popularised in the 1960s with the release of Letraset sheets containing Lorem Ipsum passages, and more
        recently with desktop publishing software like Aldus PageMaker including versions of Lorem Ipsum.

</div>
overflow: hidden;
<div style="display:block;background-color:blue;color:black;width:400px;height:100px;overflow:hidden;">

        Lorem Ipsum is simply dummy text of the printing and typesetting industry. Lorem Ipsum has been the industry's standard
        dummy text ever since the 1500s, when an unknown printer took a galley of type and scrambled it to make a type specimen
        book. It has survived not only five centuries, but also the leap into electronic typesetting, remaining essentially
        unchanged. It was popularised in the 1960s with the release of Letraset sheets containing Lorem Ipsum passages, and more
        recently with desktop publishing software like Aldus PageMaker including versions of Lorem Ipsum.
</div>
overflow: scroll;
<div style="display:block;background-color:blue;color:black;width:400px;height:100px;overflow:scroll;">
        Lorem Ipsum is simply dummy text of the printing and typesetting industry. Lorem Ipsum has been the industry's standard
        dummy text ever since the 1500s, when an unknown printer took a galley of type and scrambled it to make a type specimen
        book. It has survived not only five centuries, but also the leap into electronic typesetting, remaining essentially
        unchanged. It was popularised in the 1960s with the release of Letraset sheets containing Lorem Ipsum passages, and more
recently with desktop publishing software like Aldus PageMaker including versions of Lorem Ipsum.
</div>
overflow: auto;
<div style="display:block;background-color:blue;color:black;width:400px;height:100px;overflow:auto;">
        Lorem Ipsum is simply dummy text
</div>
<div style="display:block;background-color:blue;color:black;width:400px;height:100px;overflow:auto;">

        Lorem Ipsum is simply dummy text of the printing and typesetting industry. Lorem Ipsum has been the industry's standard
        dummy text ever since the 1500s, when an unknown printer took a galley of type and scrambled it to make a type specimen
        book. It has survived not only five centuries, but also the leap into electronic typesetting, remaining essentially
        unchanged. It was popularised in the 1960s with the release of Letraset sheets containing Lorem Ipsum passages, and more
        recently with desktop publishing software like Aldus PageMaker including versions of Lorem Ipsum.
</div>
Action selectors
These are also reffered to as 'pseudo-classes'. Don't concern yourself with what that term means, just be aware that it is used interchangeably with 'action selectors'. There are MANY 'action selectors' and you can read all about them by clicking here. But the most frequently used on is the 'hover' selector. I.E. When the mouse cursor hovers within the boundaries of a HTML element. Let's explore some examples of its use.
Change background color on mouse cursor hover
In this example the div element will change its back ground color when the mouse cursor hovers over the top of it.
HTML
<div class="div2">XXXXX<div">
CSS between the style tags <style>...</style>
<style>
          .div2
          {
                    background-color: navy;
                    color: white;
                    font-weight: bold;
          }
          .div2:hover
          {
                    background-color: blue;
                    color: white;
                    font-weight: bold;
          }
</style">
Make an element disappear on mouse cursor hover
In this example the div element will disappear when the mouse cursor hovers over the top of it.
HTML
<div class="div3">XXXXX<div">
CSS between the style tags
<style>
          .div3
          {
                    background-color: navy;
                    color: white;
                    font-weight: bold;
          }
          .div3:hover
          {
          		   /* This is a CSS comment and only HTML elements with class="div3" will disappear if the mouse
          		   	  cursor hovers over them. */
                   visabilty: hidden;
          }
</style">
Change the mouse cursor on hover
In this example the mouse cursor changes when it hovers over the top of the div.
HTML
<div class="div4">XXXXX<div">
CSS between the style tags.
<style>
          .div4
          {
                    background-color: navy;
                    color: white;
                    font-weight: bold;
          }
          .div4:hover
          {
          		   /* This is a CSS comment and the cursor will only change if the mouse cursor hovers over HTML
          		      elements with class="div4". */
                   cursor: crosshairs;
          }
</style">
The hover action selector can also be applied to:
- 'id' selectors, e.g. #div_name:hover (all elements with an id value of "div_name").
- 'tag' selectors, e.g. p:hover (all p or paragraph elements).
Further learning
There are hundreds more CSS attributes than you can experiment with, and see what they do. Some attributes work on particular types of HTML elements but have no effect on others. The best way to learn about them is to experiment. You can learn about them through the CSS reference at W3 Schools. It includes a bunch of tutorials you can work your way through. And plenty of 'try it yourself' spaces where you can experiment with different values for each CSS attribute and see exactly how they effect the way the HTML appears in a web browser.