
parent tags, child tags & inherritance
You find this concept very intuitive in everyday life, even if you are not familiar with this programming terminology. Consider the concept of a 'car'. There are many different types of cars but we always characterise them as a car.
| CAR | ||||||
| SUV | SEDAN | UTE | PANEL VAN | VAN | STATION WAGON | HATCH BACK |
All these automobiles have the common characteristics of a 'car', in addition to their own individual characteristics. You can say the 'car' is the 'parent' of all those automobiles, while each individual type of automobile is a child of the parent 'car'
So in a similar way <div> and <span> are the parent tags in HTML. All the tags described below are children of one of these two parent tags. Another way of stating it is that all the other tags described on this page are 'derived' from either <div> or <span>. As with the different types of cars above, all the HTML tags 'derived' from <div> 'inherit' its particular way of arranging itself on the screen when combined with other <div>s, but each derived tag adds a bunch of other unique characteristics to the mix. Just like a 'sedan' adds a bunch of unique characteristics to the common charactersistics of a car.
Please note that there are dozens more HTML tags available to you, but you have little hope in remembering the details of all them. I only ever use and remeber a small subset of them, most of them i have never had a reason to use them in a web page. But if you want to view the full list of HTML tags then click on this link W3Schools HTML Tag Reference.The small subset listed on this page are the most frequently used tags in this web site and are worth while getting to know.
<div>(parent tag) | |||||||||||
| <h1> | <h2> | <h3> | <h4> | <h5> | <h6> | <hr> | <ol> | <p> | <table> | <tr> | <ul> |
<span>(parent tag) | ||||||||
| <b> | <i> | <u> | <s> | <pre> | <a> | <img> | <li> | <td> |
So what is the difference between <div> and <span> tags? The difference is in how they arrange themselves on a screen.
<div>s
<div> elements (by default) arrange themselves the second below the first, and the third below the second etc. With <div> elements you can also set an explicit height and width as in the following example.
A different way to visualise it:
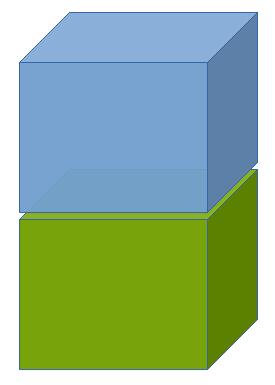
If you don't explicitly set a width and height for your divs then they look like following. The content of the div determines its height of your divs, while they 'inherit' with width of their parent element.
Parent & child HTML elements
There is also the concept of parent HTML elements containing child HTML elements, demonstrated in the following example. Note how I have used code indenting to show you the heirarchy of the divs in the HTML code. Using code indenting is VERY important in order to make your code easily comprehensible for the next person, or even yourself in 12 months time.
<div style="width:400px;height:400;background-color:blue;">
This is the parent div.
<div style="width:200px;height:200px;background-color:green;top:50px;left:20px;">
This is the child div and it is contained inside the parent div.
</div>
</div>
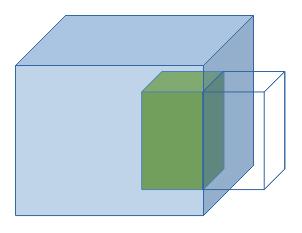
A different way to visualise it:
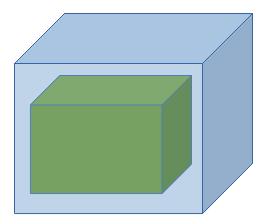
Here the same example as above but showing you more explicitly that the child div is contained within the parent div.
A different way to visualise it:
In this example width of the outer or parent div (blue) has been set a width of 100% of ITS parent.
You have to imagine that the browser window itself...
is also a <div> and it is the great great great great grandparent of every HTML element that makes up the web page.
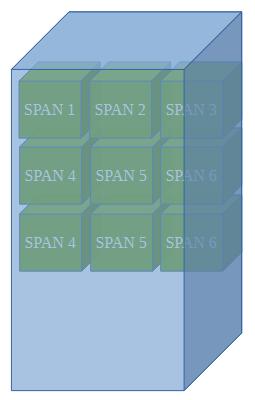
A different way to visualise it, with the purple cube being representing the web browser window.
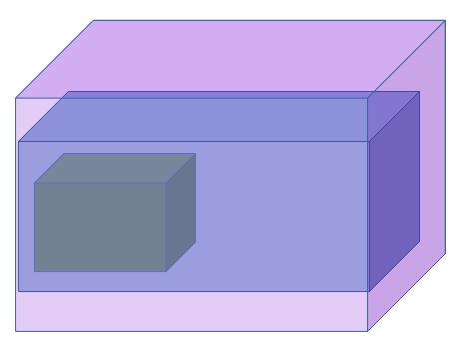
So if you tell the blue <div> to be 100% of its parent's width then it will inherit the width of the purple
<div> that represents the web browser window.
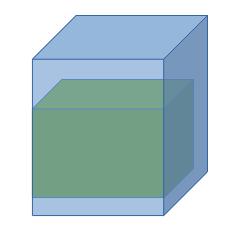
In this example width of the inner or child div (green) has been set a width of 100% of ITS parent.
A different way to visualise it:
<span>s
<span> elements (by default) display side by side, until they run out of horizontal space, and then they wrap to the next line. <span> ignores explicitly set width and height - its dimensions are determined soley by its contents.
XXXX SPAN 1 XXXX XXXX SPAN 2 XXXX XXXX SPAN 3 XXXX XXXX SPAN 4 XXXX XXXX SPAN 5 XXXX XXXX SPAN 6 XXXX XXXX SPAN 7 XXXX XXXX SPAN 8 XXXX XXXX SPAN 9 XXXX XXXX SPAN 10 XXXX XXXX SPAN 11 XXXX XXXX SPAN 12 XXXX XXXX SPAN 13 XXXX XXXX SPAN 14 XXXX XXXX SPAN 15 XXXX XXXX SPAN 16 XXXXA different way to visualise it:
<span>s as child elements of a <div>
In this example I have made all the above span elements a child of the blue div element. Again, please note how I have used code indenting to make the parent/child heirarchy of these tags clear in the HTML code.
<div style="width:400px;height:400px;background-color:BurlyWood;">This is the parent div. And all these span elements are its children.
<span style="background-color:blue">XXXX SPAN 1 XXXX</span>
<span style="background-color:green">XXXX SPAN 2 XXXX</span>
<span style="background-color:yellow">XXXX SPAN 3 XXXX</span>
<span style="background-color:red">XXXX SPAN 4 XXXX</span>
<span style="background-color:cyan">XXXX SPAN 5 XXXX</span>
<span style="background-color:orange">XXXX SPAN 6 XXXX</span>
<span style="background-color:navy">XXXX SPAN 7 XXXX</span>
<span style="background-color:teal">XXXX SPAN 8 XXXX</span>
<span style="background-color:maroon">XXXX SPAN 9 XXXX</span>
<span style="background-color:purple">XXXX SPAN 10 XXXX</span>
<span style="background-color:silver">XXXX SPAN 11 XXXX</span>
<span style="background-color:olive">XXXX SPAN 12 XXXX</span>
<span style="background-color:Honeydew">XXXX SPAN 13 XXXX</span>
<span style="background-color:CornflowerBlue">XXXX SPAN 14 XXXX</span>
<span style="background-color:DarkOrchid">XXXX SPAN 15 XXXX</span>
<span style="background-color:Chocolate">XXXX SPAN 16 XXXX</span>
</div>
Minimum structure of a HTML document
In MS Expression Web you can create a new HTML document or web page by clicking the following:
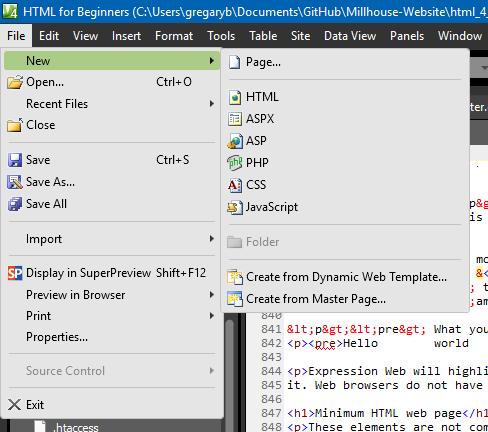
And you will get a new text file containing the following:
<!DOCTYPE html PUBLIC "-//W3C//DTD XHTML 1.0 Transitional//EN" "http://www.w3.org/TR/xhtml1/DTD/xhtml1-transitional.dtd">
<html xmlns="http://www.w3.org/1999/xhtml">

<head>
<meta content="text/html; charset=utf-8" http-equiv="Content-Type" />
<title>Untitled 1</title>
</head>

<body>

</body>

</html>
Notice how it is done a poor job of code indenting. There is a heirarchy of HTML tags here but you would be hard
pressed to discern it from this. So lets fix the indenting and the HTML tag heirarchy will reveal itself.
<!DOCTYPE html PUBLIC "-//W3C//DTD XHTML 1.0 Transitional//EN" "http://www.w3.org/TR/xhtml1/DTD/xhtml1-transitional.dtd">
<html xmlns="http://www.w3.org/1999/xhtml">

        <head>
                <meta content="text/html; charset=utf-8" http-equiv="Content-Type" />
                <title>Untitled 1</title>
        </head>

        <body>

        </body>

</html>
Now you should be able to see that the <html ...> and </html> tags are the 'granparent' tags. All the other tags or between those to tags or 'inside' that 'html' element. Then there are 2 child tags:
- <head ...> ... </head>
- <body ...> ... </body>
In turn the <head ...> ... </head> tags also contains 2 child tags:
- <meta .... / >
- <title> ... </title>
This page structure emulates that of a MS Word document and you can go as far as the following if you wish.
<!DOCTYPE html PUBLIC "-//W3C//DTD XHTML 1.0 Transitional//EN" "http://www.w3.org/TR/xhtml1/DTD/xhtml1-transitional.dtd">
<html xmlns="http://www.w3.org/1999/xhtml">

        <head>
                <meta content="text/html; charset=utf-8" http-equiv="Content-Type" />
                <title>Untitled 1</title>
                <style>
                        ...
                <style>
                <link href="styles/style4PC.css" rel="stylesheet" type="text/css" />
        </head>

		<header>

		</header>

		<body>

		</body>

		<footer>

		</footer>

</html>
Make sure you use indenting like this in your HTML code to show the tag heirarchy and make your code more easily readable by those who come after you. Or even yourself when you return to your HTML code after 12 months or whatever.
Details of these HTML tags are as follows:
-
<!DOCTYPE ...>: You can learn more about this tag by clicking
here.
REQUIRED
MS Expression Web generates this line every time you create a new HTML document. You don't necessarily need to understand fully what it does - just accept it or copy and paste if needed. Without this tag at the top of your HTML document you can run into problems with the way web browsers render your web page. -
<html>:
You can learn more about this tag by clicking
here.
REQUIRED
MS Expression Web generates the 'html' tags every time you create a new HTML document. You don't necessarily need to understand fully what it does - just accept it or copy and paste if needed. In short it lets a web browser know what version of the HTML standard the web pages uses. -
<head>: You can learn more abut this tag by clicking
here.
REQUIRED
The idea is put all those HTML tags that DO NOT form part of your visible page content between these tags. Including:- <title>Untitled 1</title>: the text between these tags is the title of your web page. Note that the document title IS NOT part of your visible page content. The page title ('Untitled 1' in this case) appears as the name of the page tab in your web browser! You can learn more about this HTML tag by clicking here. MS Expression Web generates the 'title' tags every time you create a new HTML document.
- <style>...</style>: you place all page specific CSS styling between these tags. MS Expression Web will enforce correct CSS syntax for amything your type between these tags. You can learn more about thos tag by clicking here. MS Expression Web does not generate the 'style' tags when you create a new HTML document.
- <link ... />: you also place any 'link' tags in between your 'head' tags. You use 'link' tags to 'link' external resources into your HTML document so you can use them in your HTML code. In this example the style.css (containing global CSS styling) into the HTML document. Yo can also use 'link' tags to link in google fonts, icons, multi-language support and many other types of web resources. You can learn more about this HTML tag by clicking here. MS Expression Web generates a 'link' tag for the file 'style.css' every time you create a new HTML document.
- <header>
OPTIONAL
You could use this tag to 'house' any of your visible page content that is common across all your web pages. The idea is similar to the 'header' section of a MS Word document. You can learn more about this tag by clicking here. MS Expression Web does not generate the 'header' tags when you create a new HTML document. - <body>
REQUIRED
Generally you put all your page specific content bewteen these tags. You can learn more about this tag by clicking here. MS Expression Web generates the 'body' tags every time you create a new HTML document. - <footer>
OPTIONAL
You could use this tag to 'house', for example, any of hyperlinks to Facebook and Twitter pages that is common across all your web pages. The idea is similar to the 'footer' section of a MS Word document. You can learn more about this tag by clicking here. MS Expression Web does not generate the 'footer' tags when you create a new HTML document.
Simple tags
The parent tag for all these is <span>
<b>BOLD</b>
<i>ITALIC</i>
<u>UNDERLINE</u>
<s>STRIKE THROUGH</s>
The parent tag for all these is <div>
<h1>HEADING LEVEL 1</h1>
<h2>HEADING LEVEL 2</h2>
<h3>HEADING LEVEL 3</h3>
<h4>HEADING LEVEL 4</h4>
<h5>HEADING LEVEL 5</h5>
<h6>HEADING LEVEL 6</h6>
<hr/>(shorthand)<hr></hr>(longhand)
Spaces
You get one space character for free by simply hitting the space bar on the keyboard.
But of you want more than one space character then you will need to type as
as many times as needed.
E.G. #one space# or #five spaces# (#five spaces#)
Line breaks
You need to type <br/> to get one.
E.G. No line break:
Lorem ipsum dolor sit amet, consectetur adipiscing elit. Fusce sodales justo et ipsum tincidunt porttitor.
One line break:
Lorem ipsum dolor sit amet, consectetur adipiscing elit.
Fusce sodales justo et ipsum tincidunt porttitor.
Paragraphs
The parent tag is <div>
Here is the same example as above except using paragrapgh tags instead of a line break.
<p>Lorem ipsum dolor sit amet, consectetur adipiscing elit.</p>
<p>Fusce sodales justo et ipsum tincidunt porttitor</p>
Lorem ipsum dolor sit amet, consectetur adipiscing elit.
Fusce sodales justo et ipsum tincidunt porttitor.
Unordered lists
The parent tag is <div>
<ul>
<li>First item</li>
<li>Second item</li>
<li>Third item</li>
<li>Fourth item</li>
<li>...</li>
</ul>
- First item
- Second item
- Third item
- Fourth item
- ...
Ordered lists
The parent tag is <div>
<ol>
<li>First item</li>
<li>Second item</li>
<li>Third item</li>
<li>Fourth item</li>
<li>...</li>
</ol>
- First item
- Second item
- Third item
- Fourth item
- ...
Images
The parent tag is <span>
<img src="..." alt="..." width="integer" height="integer" /> (shorthand)
<img src="..." alt="..." /></img> (longhand)
src: This can be the path for an image file within the web site.
e.g. src="images/image_filename.jpg" or it can be an image file at an external
URL e.g. src="https://google.com/images/image_filename.jpg"
alt: This is alternative text to display if the image file is not found.
Commonly it is just the name of the image file e.g. alt="image_filename.jpg"
width & height: These should be integers commonly between 20 and 500, to create
a small to moderately large image on the page. If you specify EITHER a width OR a height
then the image will resize while maintaining its aspect ratio. If you specify BOTH a width
AND a height then the image may appear distorted on the page.
E.G.
width="..." only
<img src="https://upload.wikimedia.org/wikipedia/commons/thumb/3/35/Information_icon.svg/960px-Information_icon.svg.png?_=20260201131748" alt="Google commons image" width="100" />
![]()
height="..." only
<img src="https://upload.wikimedia.org/wikipedia/commons/thumb/3/35/Information_icon.svg/960px-Information_icon.svg.png?_=20260201131748" alt="Google commons image" height="100" />
![]()
width="..." and height="..."
<img src="https://upload.wikimedia.org/wikipedia/commons/thumb/3/35/Information_icon.svg/960px-Information_icon.svg.png?_=20260201131748" alt="Google commons image" width="200" height="50" />
![]()
Hyperlinks
The parent tag is <span>
<a href="..." /><Text to display</a>
href: This can be the path for type of file within the web site.
e.g. href="join/join.html", it can be an external URL href="https://google.com" or
or it can be a bookmark within the currently loaded page e.g. href=#bookmark_name.
Some where on the page you must have a HTML tag with an id property containing the
bookmark name. e.g. <h1 id="bookmark_name">HEADING NAME</h1>. Commonly
headings are used as bookmarks, however you can also have book marks on tables,
paragraphs and images etc.
E.G. <a href="https://google.com">Click here for google</a>
Click here for google
An image as a hyperlink
<a href="https://upload.wikimedia.org/wikipedia/commons/thumb/3/35/Information_icon.svg/960px-Information_icon.svg.png?_=20260201131748" /><<img src="image_filename.jpg" alt="Google commons image" width="30" /></a>
In this example the hyperlink is to the image that is being used as the clickable page element. Clicking it
will result in the image being opened in the web browser in its own right.
E.G. <a href="https://upload.wikimedia.org/wikipedia/commons/thumb/3/35/Information_icon.svg/960px-Information_icon.svg.png?_=20260201131748"><img src="https://upload.wikimedia.org/wikipedia/commons/thumb/3/35/Information_icon.svg/960px-Information_icon.svg.png?_=20260201131748" alt="Google commons image" width="100" /></a>
![]()
Tables
The parent tag is <div>
Apart from using HTML tables for conventional purposes, you can also use them th structure web pages. If you use <div>s to structure your web pages then they have the unfortunate disadvantage of re-arranging themselves, in ways you as the web page designer do not anticipate, when the viewer re-sizes their web browser window. This can completely muck up the lay out of your web page. But if you structure your web page via a table then your web page is 'fixed in stone' and its structure cannot be re-arranged when the viewer re-sizes their web browser window.
<table border="1" cellspacing="5" cellpadding="5">
<thead><!--START HEADER-->
<tr><!--START HEADER ROW-->
<th>COLUMN 1 HEADING</th>
<th>COLUMN 2 HEADING</th>
<th>COLUMN 3 HEADING</th>
</tr><!--END HEADER ROW-->
</thead><!--END HEADER-->
<tr><!--START ROW 1-->
<td>COLUMN 1, ROW 1</td>
<td>COLUMN 2, ROW 1</td>
<td>COLUMN 3, ROW 1</td>
</tr><!--END ROW 1-->
<tr><!--START ROW 2-->
<td>COLUMN 1, ROW 2</td>
<td>COLUMN 2, ROW 2</td>
<td>COLUMN 3, ROW 2</td>
</tr><!--END ROW 2-->
<tr><!--START ROW 3-->
<td>COLUMN 1, ROW 3</td>
<td>COLUMN 2, ROW 3</td>
<td>COLUMN 3, ROW 3</td>
</tr><!--END ROW 3-->
</table>
border="0" cellspacing="0" cellpadding="0"
| COLUMN 1 HEADING | COLUMN 2 HEADING | COLUMN 3 HEADING |
|---|---|---|
| COLUMN 1, ROW 1 | COLUMN 2, ROW 1 | COLUMN 3, ROW 1 |
| COLUMN 1, ROW 2 | COLUMN 2, ROW 2 | COLUMN 3, ROW 2 |
| COLUMN 1, ROW 3 | COLUMN 2, ROW 3 | COLUMN 3, ROW 3 |
border="1" cellspacing="0" cellpadding="0"
| COLUMN 1 HEADING | COLUMN 2 HEADING | COLUMN 3 HEADING |
|---|---|---|
| COLUMN 1, ROW 1 | COLUMN 2, ROW 1 | COLUMN 3, ROW 1 |
| COLUMN 1, ROW 2 | COLUMN 2, ROW 2 | COLUMN 3, ROW 2 |
| COLUMN 1, ROW 3 | COLUMN 2, ROW 3 | COLUMN 3, ROW 3 |
border="1" cellspacing="10" cellpadding="0"
| COLUMN 1 HEADING | COLUMN 2 HEADING | COLUMN 3 HEADING |
|---|---|---|
| COLUMN 1, ROW 1 | COLUMN 2, ROW 1 | COLUMN 3, ROW 1 |
| COLUMN 1, ROW 2 | COLUMN 2, ROW 2 | COLUMN 3, ROW 2 |
| COLUMN 1, ROW 3 | COLUMN 2, ROW 3 | COLUMN 3, ROW 3 |
border="1" cellspacing="0" cellpadding="10"
| COLUMN 1 HEADING | COLUMN 2 HEADING | COLUMN 3 HEADING |
|---|---|---|
| COLUMN 1, ROW 1 | COLUMN 2, ROW 1 | COLUMN 3, ROW 1 |
| COLUMN 1, ROW 2 | COLUMN 2, ROW 2 | COLUMN 3, ROW 2 |
| COLUMN 1, ROW 3 | COLUMN 2, ROW 3 | COLUMN 3, ROW 3 |
Using colspan to merge columns
<table border="1" cellspacing="5" cellpadding="5">
<thead><!--START HEADER-->
<tr><!--START HEADER ROW-->
<th>COLUMN 1 HEADING</th>
<th>COLUMN 2 HEADING</th>
<th>COLUMN 3 HEADING</th>
</tr><!--END HEADER ROW-->
</thead><!--END HEADER-->
<tr><!--START ROW 1-->
<td colspan="2">COLUMN 1 & 2, ROW 1</td>
<!-- OMITT COLUMN 2 -->
<td>COLUMN 3, ROW 1</td>
</tr><!--END ROW 1-->
<tr><!--START ROW 2-->
<td>COLUMN 1, ROW 2</td>
<td>COLUMN 2, ROW 2</td>
<td>COLUMN 3, ROW 2</td>
</tr><!--END ROW 2-->
<tr><!--START ROW 3-->
<td>COLUMN 1, ROW 3</td>
<td>COLUMN 2, ROW 3</td>
<td>COLUMN 3, ROW 3</td>
</tr><!--END ROW 3-->
</table>
| COLUMN 1 HEADING | COLUMN 2 HEADING | COLUMN 3 HEADING |
|---|---|---|
| COLUMN 1 & 2, ROW 1 | COLUMN 2, ROW 1 | |
| COLUMN 1, ROW 2 | COLUMN 2, ROW 2 | COLUMN 3, ROW 2 |
| COLUMN 1, ROW 3 | COLUMN 2, ROW 3 | COLUMN 3, ROW 3 |
Using rowspan to merge rows
<table border="1" cellspacing="5" cellpadding="5">
<thead><!--START HEADER-->
<tr><!--START HEADER ROW-->
<th>COLUMN 1 HEADING</th>
<th>COLUMN 2 HEADING</th>
<th>COLUMN 3 HEADING</th>
</tr><!--END HEADER ROW-->
</thead><!--END HEADER-->
<tr><!--START ROW 1-->
<td rowspan="2">COLUMN 1, ROW 1 & 2</td>
<td>COLUMN 2, ROW 1</td>
<td>COLUMN 2, ROW 1</td>
<td>COLUMN 3, ROW 1</td>
</tr><!--END ROW 1-->
<tr><!--START ROW 2-->
<!-- OMITT COLUMN 1 ON ROW 2 -->
<td>COLUMN 2, ROW 2</td>
<td>COLUMN 3, ROW 2</td>
</tr><!--END ROW 2-->
<tr><!--START ROW 3-->
<td>COLUMN 1, ROW 3</td>
<td>COLUMN 2, ROW 3</td>
<td>COLUMN 3, ROW 3</td>
</tr><!--END ROW 3-->
</table>
| COLUMN 1 HEADING | COLUMN 2 HEADING | COLUMN 3 HEADING |
|---|---|---|
| COLUMN 1, ROW 1 & 2 | COLUMN 2, ROW 1 | COLUMN 3, ROW 1 |
| COLUMN 2, ROW 2 | COLUMN 3, ROW 2 | |
| COLUMN 1, ROW 3 | COLUMN 2, ROW 3 | COLUMN 3, ROW 3 |
Nesting tags
You can freely nest those tags that are 'children' of or derived from <span>. So tags like of <b>, <a> , <u> and <i> etc. can be freely nested one inside another and inside another. For example these nestings are perfectly fine in HTML:
- <a href="..."><img src="..." alt="..." /></a>
- <b><u><i>XXXXXXX</i></u></b>
- <img src="..." alt="..."><b>XXXXXX</b></img>
The only thing to be mindful of is to make sure you close the opening tags in the matching sequence. Doing this, for example, might lead to unexpected results: <b><u><i>XXXXXXX</b></u></i>
You can freely nest <div>s (specifically) inside each other as deeply as you want. However you should not nest tags that are children of or derived from <div> inside each other.For example, do not nest a <ul> tag inside a <p> tag. Expression Web will tell you that you have an error in your HTML and you can get some rather mysterious and unpredictable results in your web page. However you can nest a <p> tag, for example, inside a <div> tag (spcifically).
Now at this point I bet you are confused as hell about what I am trying to explain to you. But there is an everyday analogy that can go a long way to helping you comprehend all this. Let's consider the following substitutions:
- <div>...</div> becomes <mechanics_garage>...</mechanics_garage>
- <ul>...</ul> becomes <holden_body>...</holden_body>
- <p>...</p> becomes <toyota_engine>...</toyota_engine>
Now, if you do this nesting of tags then all is as you expect it...
<mechanics_garage>
<holden_body>...</holden_body>
<toyota_engine>...</toyota_engine>
</mechanics_garage>
But, if you do this nesting of tags then disaster will occur. Because you can't put a toyota engine in a holden body.
<mechanics_garage>
<holden_body>
<toyota_engine>...</toyota_engine>
</holden_body>
</mechanics_garage>
<pre> & <p> tags
<pre> What you type is what you get.</pre>Hello world &<> !@#$%^*()_-+=:;"{',./
<p> What you type is mostly what you get.</p>Hello world &<> !@#$%^*()_-+=:;"{',./
In the case of <p> tags you get one space character for free. If you want more than that in a row then you have to use &&&&&. Or you could nest <pre> tags inside <p> tags.
<p><pre> What you type is what you get.</pre></p>Hello world &<> !@#$%^*()_-+=:;"{',./
Expression Web will highlight HTML errors if you type an & inside <pre> tags, for example, but just ignore it. Web browsers do not have a problem with this.
Try all this!
While MS Expression Web makes editing web pages and entire web sites much easier. You don't actually need any special software to create a HTML web page. You could do ALL of this with MS Windows Notepad, available in the Accesories section of the start menu of any version of MS Windows. Simply copy any of this HTML code, paste it into Notepad, save the file as 'example.htm', use File Explorer or This Computer to browse your way to the file's folder location (likely in your 'documents' folder) and double click on the file - it should come up in your web browser. If not then right click on 'example.htm', select 'open with' and then select your web browser from the list of options.
HTML Emojis
You can insert the same emojis in your content as you can in Facebook and Facebook messengers. Here are a few of them:
- 😀: 😀
- 😁: 😁
- 😂: 😂
- 😃: 😃
- 😄: 😄
- 😅: 😅
- 😆: 😆
You can see the full list of available emojis by clicking here.