|
|||||||||||||||||||||||||||||||||||||||||||||||||||||||||||||||||||||||||||||||||||||||||||||||||||||||||||||||||||||||||||||||||||||||||||||||||||||||||||||||||||||||||||||||||||||||||||||||||||||||||||||||||||||||||||||||||||||||||||||||||||||||||||||||||||||||||||||||||||||||||||||||||||||||||||||||||||||||||||||||||||||||||||||||||||||||||||||||||||||||||||||||||||||||||||||||||||||||||||||||||||||||||||||||||||||||||||||||||||||||||||||||||||||||||||||||||||||||||||||||||||||||||||||||||||||||||||||||||||||||||||||||||||||||||||||||||||||||||||||||||||||||||||||||||||||||||||||||||||||||||||||||||||||||||||||||||||||||||||||||||||||||||||||||||||||||||||||||||||||||||||||||||||||||||||||||||||||||||||||||||||||||||||||||||||||||||||||||||||||||||||||||||||||||||||||||||||||||||||||||||||||||||||||||||||||||||||||||||||||||||||||||||||||||||||||||||||||||||||||||||||||||||||||||||||||||||||||||||||||||||||||||||||||||||||||||||||||||||||||||||||||||||||||||||||||||||||||||||||||||
|
|
|||||||||||||||||||||||||||||||||||||||||||||||||||||||||||||||||||||||||||||||||||||||||||||||||||||||||||||||||||||||||||||||||||||||||||||||||||||||||||||||||||||||||||||||||||||||||||||||||||||||||||||||||||||||||||||||||||||||||||||||||||||||||||||||||||||||||||||||||||||||||||||||||||||||||||||||||||||||||||||||||||||||||||||||||||||||||||||||||||||||||||||||||||||||||||||||||||||||||||||||||||||||||||||||||||||||||||||||||||||||||||||||||||||||||||||||||||||||||||||||||||||||||||||||||||||||||||||||||||||||||||||||||||||||||||||||||||||||||||||||||||||||||||||||||||||||||||||||||||||||||||||||||||||||||||||||||||||||||||||||||||||||||||||||||||||||||||||||||||||||||||||||||||||||||||||||||||||||||||||||||||||||||||||||||||||||||||||||||||||||||||||||||||||||||||||||||||||||||||||||||||||||||||||||||||||||||||||||||||||||||||||||||||||||||||||||||||||||||||||||||||||||||||||||||||||||||||||||||||||||||||||||||||||||||||||||||||||||||||||||||||||||||||||||||||||||||||||||||||||||
Table of contentsHTML for beginnersparent tags, child tags & inherritanceYou find this concept very intuitive in everyday life, even if you are not familiar with this programming terminology. Consider the concept of a 'car'. There are many different types of cars but we always characterise them as a car.
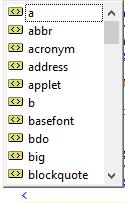
All these automobiles have the common characteristics of a 'car', in addition to their own individual characteristics. You can say the 'car' is the 'parent' of all those automobiles, while each individual type of automobile is a child of the parent 'car' So in a similar way <div> and <span> are the parent tags in HTML. All the tags described below are children of one of these two parent tags. Another way of stating it is that all the other tags described on this page are 'derived' from either <div> or <span>. As with the different types of cars above, all the HTML tags 'derived' from <div> 'inherit' its particular way of arranging itself on the screen when combined with other <div>s, but each derived tag adds a bunch of other unique characteristics to the mix. Just like a 'sedan' adds a bunch of unique characteristics to the common charactersistics of a car. Please note that there are dozens more HTML tags available to you, but you have little hope in remembering the details of all them. I only ever use and remeber a small subset of them, most of them i have never had a reason to use them in a web page. But if you want to view the full list of HTML tags then click on this link W3Schools HTML Tag Reference.The small subset listed on this page are the most frequently used tags in this web site and are worth while getting to know.
So what is the difference between <div> and <span> tags? The difference is in how they arrange themselves on a screen. <div>s<div> elements (by default) arrange themselves the second below the first, and the third below the second etc. With <div> elements you can also set an explicit height and width as in the following example. FIRST DIV
SECOND DIV
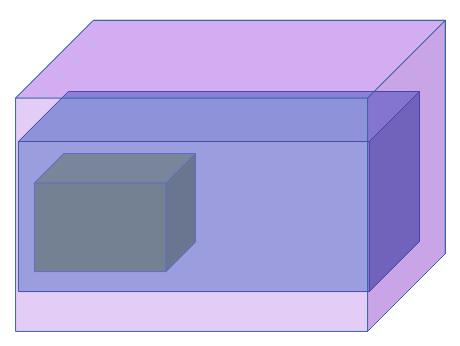
A different way to visualise it: If you don't explicitly set a width and height for your divs then they look like following. The content of the div determines its height of your divs, while they 'inherit' with width of their parent element. FIRST DIV
SECOND DIV
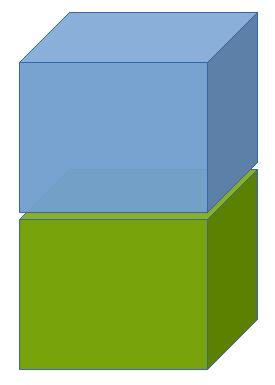
Parent & child HTML elementsThere is also the concept of parent HTML elements containing child HTML elements, demonstrated in the following example. Note how I have used code indenting to show you the heirarchy of the divs in the HTML code. Using code indenting is VERY important in order to make your code easily comprehensible for the next person, or even yourself in 12 months time. <div style="width:400px;height:400;background-color:blue;"> This is the parent div. <div style="width:200px;height:200px;background-color:green;top:50px;left:20px;"> This is the child div and it is contained inside the parent div.
This is the parent div.
This is the child div and it is contained inside the parent div.
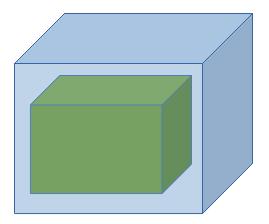
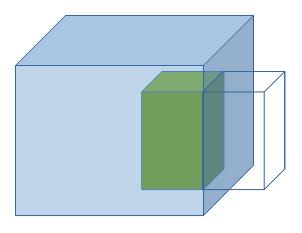
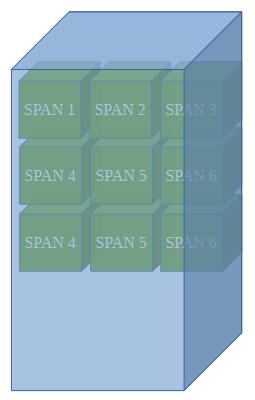
A different way to visualise it: Here the same example as above but showing you more explicitly that the child div is contained within the parent div. A different way to visualise it: In this example width of the outer or parent div (blue) has been set a width of 100% of ITS parent. You have to imagine that the browser window itself... A different way to visualise it, with the purple cube being representing the web browser window. In this example width of the inner or child div (green) has been set a width of 100% of ITS parent. A different way to visualise it: <span>s<span> elements (by default) display side by side, until they run out of horizontal space, and then they wrap to the next line. <span> ignores explicitly set width and height - its dimensions are determined soley by its contents. XXXX SPAN 1 XXXX XXXX SPAN 2 XXXX XXXX SPAN 3 XXXX XXXX SPAN 4 XXXX XXXX SPAN 5 XXXX XXXX SPAN 6 XXXX XXXX SPAN 7 XXXX XXXX SPAN 8 XXXX XXXX SPAN 9 XXXX XXXX SPAN 10 XXXX XXXX SPAN 11 XXXX XXXX SPAN 12 XXXX XXXX SPAN 13 XXXX XXXX SPAN 14 XXXX XXXX SPAN 15 XXXX XXXX SPAN 16 XXXXA different way to visualise it: <span>s as child elements of a <div>In this example I have made all the above span elements a child of the blue div element. Again, please note how I have used code indenting to make the parent/child heirarchy of these tags clear in the HTML code. <div style="width:400px;height:400px;background-color:BurlyWood;"> This is the parent div. And all these span elements are its children.
This is the parent div. And all these span elements are its children.
XXXX SPAN 1 XXXX
XXXX SPAN 2 XXXX
XXXX SPAN 3 XXXX
XXXX SPAN 4 XXXX
XXXX SPAN 5 XXXX
XXXX SPAN 6 XXXX
XXXX SPAN 7 XXXX
XXXX SPAN 8 XXXX
XXXX SPAN 9 XXXX
XXXX SPAN 10 XXXX
XXXX SPAN 11 XXXX
XXXX SPAN 12 XXXX
XXXX SPAN 13 XXXX
XXXX SPAN 14 XXXX
XXXX SPAN 15 XXXX
XXXX SPAN 16 XXXX
Minimum structure of a HTML document
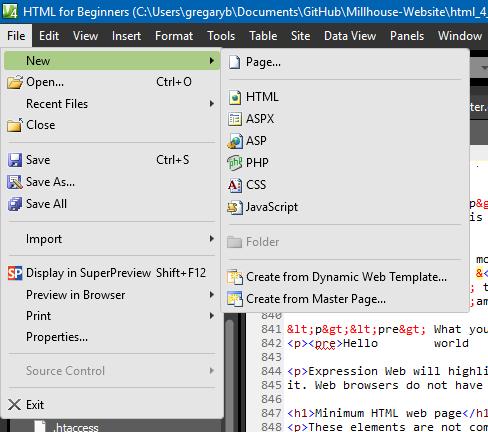
In MS Expression Web you can create a new HTML document or web page by clicking the following: <!DOCTYPE html PUBLIC "-//W3C//DTD XHTML 1.0 Transitional//EN" "http://www.w3.org/TR/xhtml1/DTD/xhtml1-transitional.dtd"> <html xmlns="http://www.w3.org/1999/xhtml"> <head> <meta content="text/html; charset=utf-8" http-equiv="Content-Type" /> <title>Untitled 1</title> </head> <body> </body> </html> Notice how it is done a poor job of code indenting. There is a heirarchy of HTML tags here but you would be hard pressed to discern it from this. So lets fix the indenting and the HTML tag heirarchy will reveal itself. <!DOCTYPE html PUBLIC "-//W3C//DTD XHTML 1.0 Transitional//EN" "http://www.w3.org/TR/xhtml1/DTD/xhtml1-transitional.dtd"> <html xmlns="http://www.w3.org/1999/xhtml"> <head> <meta content="text/html; charset=utf-8" http-equiv="Content-Type" /> <title>Untitled 1</title> </head> <body> </body> </html> Now you should be able to see that the <html ...> and </html> tags are the 'granparent' tags. All the other tags or between those to tags or 'inside' that 'html' element. Then there are 2 child tags:
In turn the <head ...> ... </head> tags also contains 2 child tags:
This page structure emulates that of a MS Word document and you can go as far as the following if you wish. <!DOCTYPE html PUBLIC "-//W3C//DTD XHTML 1.0 Transitional//EN" "http://www.w3.org/TR/xhtml1/DTD/xhtml1-transitional.dtd"> <html xmlns="http://www.w3.org/1999/xhtml"> <head> <meta content="text/html; charset=utf-8" http-equiv="Content-Type" /> <title>Untitled 1</title> <style> ... <style> <link href="styles/style4PC.css" rel="stylesheet" type="text/css" /> </head> <header> </header> <body> </body> <footer> </footer> </html> Make sure you use indenting like this in your HTML code to show the tag heirarchy and make your code more easily readable by those who come after you. Or even yourself when you return to your HTML code after 12 months or whatever. Details of these HTML tags are as follows:
Simple tagsText stylesThe parent tag for all these is <span> <b>BOLD</b> <i>ITALIC</i> <u>UNDERLINE</u> <s> HeadingsThe parent tag for all these is <div>
Horizontal line<hr/>(shorthand) Spaces
You get one space character for free by simply hitting the space bar on the keyboard. Line breaks
You need to type <br/> to get one. Compound tagsParagraphsThe parent tag is <div> Here is the same example as above except using paragrapgh tags instead of a line break. <p>Lorem ipsum dolor sit amet, consectetur adipiscing elit.</p> <p>Fusce sodales justo et ipsum tincidunt porttitor</p> Lorem ipsum dolor sit amet, consectetur adipiscing elit. Fusce sodales justo et ipsum tincidunt porttitor. Unordered listsThe parent tag is <div> <ul> <li>First item</li> <li>Second item</li> <li>Third item</li> <li>Fourth item</li> <li>...</li> </ul>
Ordered listsThe parent tag is <div> <ol> <li>First item</li> <li>Second item</li> <li>Third item</li> <li>Fourth item</li> <li>...</li> </ol>
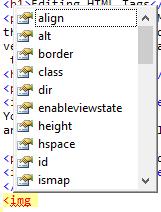
ImagesThe parent tag is <span> <img src="..." alt="..." width="integer" height="integer" /> (shorthand)
src: This can be the path for an image file within the web site. E.G. width="..." only <img src="https://upload.wikimedia.org/wikipedia/commons/thumb/3/35/Information_icon.svg/960px-Information_icon.svg.png?_=20260201131748" alt="Google commons image" width="100" />
E.G. height="..." only
	<img src="https://upload.wikimedia.org/wikipedia/commons/thumb/3/35/Information_icon.svg/960px-Information_icon.svg.png?_=20260201131748" alt="Google commons image" height="100" />
E.G. width="..." and height="..."
	<img src="https://upload.wikimedia.org/wikipedia/commons/thumb/3/35/Information_icon.svg/960px-Information_icon.svg.png?_=20260201131748" alt="Google commons image" width="200" height="50" />
HyperlinksThe parent tag is <span>
<a href="..." /><Text to display</a>
href: This can be the path for type of file within the web site. E.G. <a href="https://google.com">Click here for google</a> An image as a hyperlink<a href="https://upload.wikimedia.org/wikipedia/commons/thumb/3/35/Information_icon.svg/960px-Information_icon.svg.png?_=20260201131748" /><<img src="image_filename.jpg" alt="Google commons image" width="30" /></a>
In this example the hyperlink is to the image that is being used as the clickable page element. Clicking it TablesThe parent tag is <div> Apart from using HTML tables for conventional purposes, you can also use them th structure web pages. If you use <div>s to structure your web pages then they have the unfortunate disadvantage of re-arranging themselves, in ways you as the web page designer do not anticipate, when the viewer re-sizes their web browser window. This can completely muck up the lay out of your web page. But if you structure your web page via a table then your web page is 'fixed in stone' and its structure cannot be re-arranged when the viewer re-sizes their web browser window. <table border="1" cellspacing="5" cellpadding="5"> <thead><!--START HEADER--> <tr><!--START HEADER ROW--> <th>COLUMN 1 HEADING</th> <th>COLUMN 2 HEADING</th> <th>COLUMN 3 HEADING</th> </tr><!--END HEADER ROW--> </thead><!--END HEADER--> <tr><!--START ROW 1--> <td>COLUMN 1, ROW 1</td> <td>COLUMN 2, ROW 1</td> <td>COLUMN 3, ROW 1</td> </tr><!--END ROW 1--> <tr><!--START ROW 2--> <td>COLUMN 1, ROW 2</td> <td>COLUMN 2, ROW 2</td> <td>COLUMN 3, ROW 2</td> </tr><!--END ROW 2--> <tr><!--START ROW 3--> <td>COLUMN 1, ROW 3</td> <td>COLUMN 2, ROW 3</td> <td>COLUMN 3, ROW 3</td> </tr><!--END ROW 3--> </table> border="0" cellspacing="0" cellpadding="0"
border="1" cellspacing="0" cellpadding="0"
border="1" cellspacing="10" cellpadding="0"
border="1" cellspacing="0" cellpadding="10"
Using colspan to merge columns<table border="1" cellspacing="5" cellpadding="5"> <thead><!--START HEADER--> <tr><!--START HEADER ROW--> <th>COLUMN 1 HEADING</th> <th>COLUMN 2 HEADING</th> <th>COLUMN 3 HEADING</th> </tr><!--END HEADER ROW--> </thead><!--END HEADER--> <tr><!--START ROW 1--> <td colspan="2">COLUMN 1 & 2, ROW 1</td> <!-- OMITT COLUMN 2 -->
Using rowspan to merge rows<table border="1" cellspacing="5" cellpadding="5"> <thead><!--START HEADER--> <tr><!--START HEADER ROW--> <th>COLUMN 1 HEADING</th> <th>COLUMN 2 HEADING</th> <th>COLUMN 3 HEADING</th> </tr><!--END HEADER ROW--> </thead><!--END HEADER--> <tr><!--START ROW 1--> <td rowspan="2">COLUMN 1, ROW 1 & 2</td> <td>COLUMN 2, ROW 1</td> <td>COLUMN 2, ROW 1</td> <td>COLUMN 3, ROW 1</td> </tr><!--END ROW 1--> <tr><!--START ROW 2--> <!-- OMITT COLUMN 1 ON ROW 2 -->
Nesting tagsYou can freely nest those tags that are 'children' of or derived from <span>. So tags like of <b>, <a> , <u> and <i> etc. can be freely nested one inside another and inside another. For example these nestings are perfectly fine in HTML:
The only thing to be mindful of is to make sure you close the opening tags in the matching sequence. Doing this, for example, might lead to unexpected results: <b><u><i>XXXXXXX</b></u></i> You can freely nest <div>s (specifically) inside each other as deeply as you want. However you should not nest tags that are children of or derived from <div> inside each other.For example, do not nest a <ul> tag inside a <p> tag. Expression Web will tell you that you have an error in your HTML and you can get some rather mysterious and unpredictable results in your web page. However you can nest a <p> tag, for example, inside a <div> tag (spcifically). Now at this point I bet you are confused as hell about what I am trying to explain to you. But there is an everyday analogy that can go a long way to helping you comprehend all this. Let's consider the following substitutions:
Now, if you do this nesting of tags then all is as you expect it... But, if you do this nesting of tags then disaster will occur. Because you can't put a toyota engine in a holden body. <pre> & <p> tags<pre> What you type is what you get.</pre>Hello world &<> !@#$%^*()_-+=:;"{',./
<p> What you type is mostly what you get.</p>
Hello world &<> !@#$%^*()_-+=:;"{',./ In the case of <p> tags you get one space character for free. If you want more than that in a row then you have to use &&&&&. Or you could nest <pre> tags inside <p> tags. <p><pre> What you type is what you get.</pre></p>Hello world &<> !@#$%^*()_-+=:;"{',./
Expression Web will highlight HTML errors if you type an & inside <pre> tags, for example, but just ignore it. Web browsers do not have a problem with this. Try all this!While MS Expression Web makes editing web pages and entire web sites much easier. You don't actually need any special software to create a HTML web page. You could do ALL of this with MS Windows Notepad, available in the Accesories section of the start menu of any version of MS Windows. Simply copy any of this HTML code, paste it into Notepad, save the file as 'example.htm', use File Explorer or This Computer to browse your way to the file's folder location (likely in your 'documents' folder) and double click on the file - it should come up in your web browser. If not then right click on 'example.htm', select 'open with' and then select your web browser from the list of options. HTML EmojisYou can insert the same emojis in your content as you can in Facebook and Facebook messengers. Here are a few of them:
You can see the full list of available emojis by clicking here. CSS for beginnersCSS stands for Cascading Style Sheets. CSS provides a way to apply different sets of formatting styles to the same HTML document. You could use them, for example, to make the text in a HTML document larger and more easily readable by vision impaired visitors, without effecting what vistors with normal vision see. There are HUNDREDS of different CSS properties that you can change to have a wide variety of effects on the individual behavior and appearance of your HTML elements. There is no hope of trying to describe all of them here so we will simply explore a few of the most commonly used properties and selectors. For a full reference for ALL the CSS properties please click here for the excellent W3Schools CSS reference. How do you apply CSS styling?Definitions and terminology
What is 'scope'Well no doubt you are familiar with the concept of scope when it comes to writing some sort of organisational report or proposal. For example, the scope of your report might be limited to the next 5 yeasr only or to the VIC operation but not the national operation. Scope in the context of CSS is somewhat similar. The scope of your CSS styling can apply:
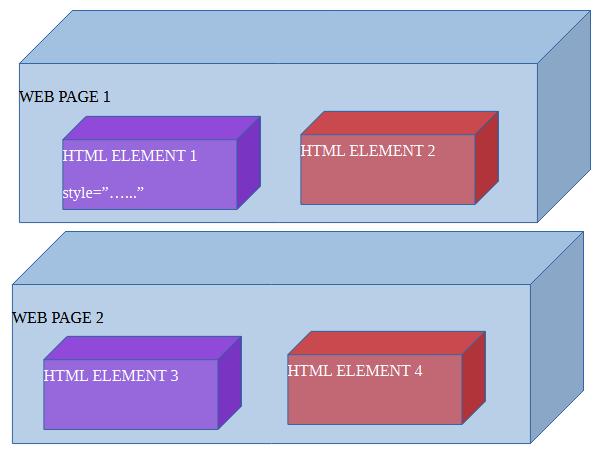
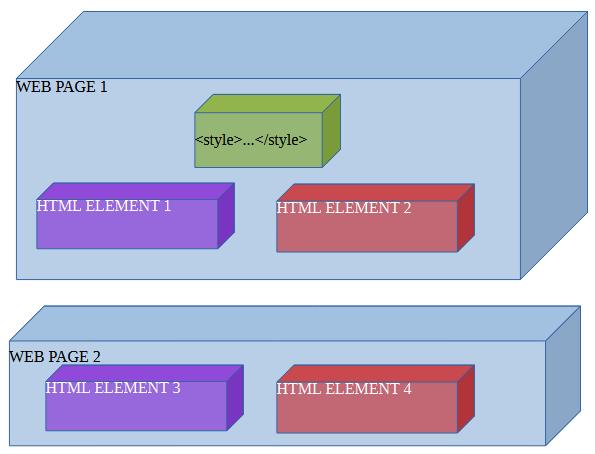
Inline CSSThis is used for 'one off' styling of particular HTML elements within the current web page. You insert your CSS styling into the 'style' property between the double quotes, e.g. <div style="background-color:blue;">...</div>. The 'style' property is one of the generic HTML tag properties that you can apply to ANY HTML element. <style> / </style> tagsThis is used for styling of one or more elements but in the current web page only. HTML elements on other web pages
CANNOT 'see' the CSS styles between the <style>...</style> on other web pages. However HTML elements 3 and 4 cannot 'see' the styles on HTML page 1. The styles on web page 1 are said to be 'out of scope' for HTML elements 3 and 4 on web page 2. Remember the basic tag structure of a HTML document? Click here if you need to read it again. The style tags are typically located within the head tags, like this:
<!DOCTYPE html PUBLIC "-//W3C//DTD XHTML 1.0 Transitional//EN" "http://www.w3.org/TR/xhtml1/DTD/xhtml1-transitional.dtd">
<html xmlns="http://www.w3.org/1999/xhtml">

        <head>
                <meta content="text/html; charset=utf-8" http-equiv="Content-Type" />
                <title>Untitled 1</title>
                <style>
                        ...
                </style>
        </head>

        <body>
			...
        </body>

</html>
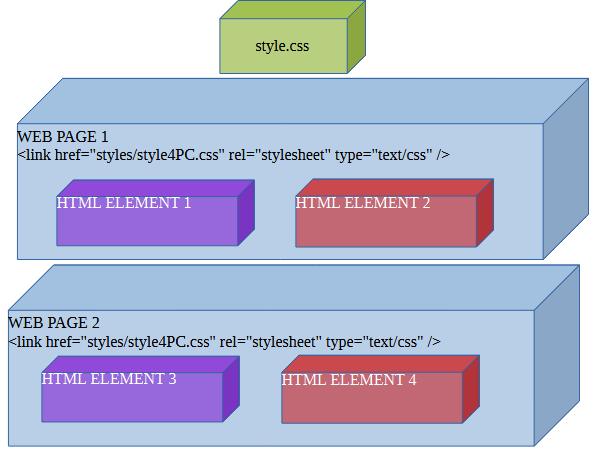
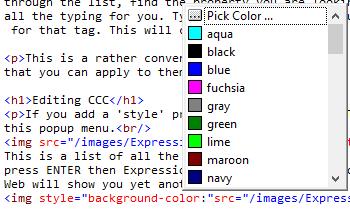
The file style.cssThis is used for 'global' or 'god' styling of one or more HTML elements across multiple HTML web pages. MS Expression web likes to use the file name 'style.css' for this but you do not have stick this this file name if you do not want to. You could two style sheets in principle - 'StyleVisionImpaired.css' and StyleNormalVision.css' for example. It is up to you what filename you give your style sheet(s). MS Expression Web also likes to store your 'style.css' file in a sub-folder named 'styles'. But again you can store then in any sub-folder you chose, or not store them in any sub-folder at all. However every HTML web page in which you want to use your style sheet(s) MUST have this line of HTML code in them: <link href="styles/style4PC.css" rel="stylesheet" type="text/css" /> You can read all bout the HTML <Link ... > tag here if you wish to. Or just do what i do - copy and paste the text from another HTML web page. The link tag must correctly tell the web browser what sub-folder (or not) where it will find your .css file, and its correct filename. As long as you include an appropriate <link ... > tag in both web pages 1 and 2 then all the styles you put in
your style.css then they are 'in scope' for both web pages 1 and 2, and HTML elements 1, 2, 3 and 4. What is the purpose of this 'scoping'?The purpose of all this is to allow you you to 're-use' your CSS styling across multiple elements and multiple web pages, without having to tyoe the same CSS styling over and over again for individual elements and individual HTML web pages. But the system ALSO allows you to 'compartmentalise' your CSS styling. For example, if web page 1 has CSS style that you don't need use in web page 2 then you put them between the <style> tags OF web page 1. If you have styles that you need to apply to a particular HTML element and other then use inline styling (style="..."). Via ID selectorsThis method employs the use of the HTML tag property 'id' as the means of selecting those HTML elements to which a set of CSS styles will be applied. Remember the HTML tag property 'id' can be applied to ANY type of HTML element - it is generic property. E.G. <div id="green_div">######</div> <div id="other_div">$$$$$$</div> <div id="green_div">@@@@@@</div> Then, either between the <style">...</style>vin your HTML web page or in 'style.css' you do this:
#green_div
{
		  background-color: green;
		  border-style: solid;
		  border-color: red;
		  border-width: thick;
}
And here are the results: ######
$$$$$$
@@@@@@
Notice that only the top and bottom divs (with id="green_div") have green backgrounds and thick red borders. The middle div (with id="other_div" and text content "$$$$$$") does not. However I recomend against using this technique as it can cause problems if you use Javascript in your web page. Particularly with the Javascript function document.getElementById("unique_element_id"). It requires that the HTML element you are trying to 'get' has a unique name for its 'id' property. Using the CSS id selector requires mutiple HTML elements to have a shared name for their 'id' property. Hence document.getElementById("unique_element_id") simply will not work as you expect it to. Via class selectorsThis is a better way of appying CSS styles to multiple HTML elements. <div class="green_div big_white_text">######</div> <div class="other_div">$$$$$$</div> <div class="green_div">@@@@@@</div> You utilise the 'class' property instead and specify one or more a unique 'class' names. This method has a major advantage over the 'id' method in that you can apply multiple class names with different sets of CSS styles as in this example. Then, either between the <style">...</style> in your HTML web page or in 'style.css' you do this:
.green_div
{
background-color: green;
border-style: solid;
border-color: red;
border-width: thick;
}
.big_white_text
{
color: white;
font-size: xx-large;
}
And here are the results: ######
$$$$$$
@@@@@@
Via tag selectorsYou can also apply selectively apply CSS styles via tag selectors. You use tag selectors if you want your styles applied to every single isntance of any particular tag. <span>######</span> <span>$$$$$$</span> <span>@@@@@@</span> Notice that neither the 'id' or 'class' properties are specified for these spans. And between the between the <style">...</style> in your HTML web page or in 'style.css' you do the following with the tag name you want the styles applied to.
span
{
	background-color: green;
	border-style: solid;
	border-color: red;
	border-width: thick;
	color: white;
	font-size: xx-large;
}
And here are the results: ###### $$$$$$ @@@@@@All 3 HTML elements are spans therefore all three have green backgrounds, thick red borders and big white text. And you have now learned how to use your first six CSS properties. MS Expression Web will show you a popup lists of CSS properties you can use, and popup lists of values you can apply to each attribute, as you type within style="..." and the <style>...</style> tags. Specifying colorsThere are many named colors that you can apply to the 'background-color' and 'color' properties and you can read about them here. Or you can invent your own colors via hex values, rgb(...) and rgba(...), hls(...) and hlsa(...). Simple named colours are the most convenient to use. BordersYou have VERY fine control over borders so let's look at some quick examples. And you can read all about CSS borders by clicking here. border-style<div style="border-style:solid;width:100px;">XXXXXXX</div> <div style="border-style:dotted;width:100px;">XXXXXXX</div> <div style="border-style:dashed;width:100px;">XXXXXXX</div> <div style="border-style:double;width:100px;">XXXXXXX</div> <div style="border-style:inset;width:100px;">XXXXXXX</div> <div style="border-style:outset;width:100px;;">XXXXXXX</div> <div style="border-style:ridge;width:100px;">XXXXXXX</div> <div style="border-style:groove;width:100px;;">XXXXXXX</div> The results are: XXXXXXX XXXXXXX XXXXXXX XXXXXXX XXXXXXX XXXXXXX XXXXXXX XXXXXXX
Or... <div style="border-left-style:solid;border-top-style:dotted;border-right-style:dashed;border-bottom-style:double;width:100px;">XXXXXXX</div> <div style="border:solid dotted dashed double;width:100px;">XXXXXXX</div> The results are: XXXXXXX ;XXXXXXX
border-widthDEFAULT VALUE: "thin" <div style="border-style:solid;border-width:thin;width:100px;">XXXXXXX</div> <div style="border-style:solid;border-width:medium;width:100px;">XXXXXXX</div> <div style="border-style:solid;border-width:thick;width:100px;">XXXXXXX</div> <div style="border-style:solid;border-width:20px;width:100px;">XXXXXXX</div> The results are: XXXXXXX XXXXXXX XXXXXXX XXXXXXX border-colorDEFAULT VALUE: "black" <div style="border-style:solid;border-width:medium;border-color:red;width:100px;">XXXXXXX</div> <div style="border-style:solid;border-width:medium;border-color:green;width:100px;">XXXXXXX</div> <div style="border-style:solid;border-width:medium;border-color:blue;width:100px;">XXXXXXX</div> The results are: XXXXXXX XXXXXXX XXXXXXX border-radiusDEFAULT VALUE: "0px" (sharp corners) <div style="border-style:solid;border-width:medium;border-color:red;border-radius:3px;width:100px;">XXXXXXX</div> <div style="border-style:solid;border-width:medium;border-color:green;border-radius:5px;width:100px;">XXXXXXX</div> <div style="border-style:solid;border-width:medium;border-color:blue;border-radius:10px;width:100px;">XXXXXXX</div> <div style="border-style:solid;border-width:medium;border-color:blue;border-radius:20px;width:100px;">XXXXXXX</div> The results are: XXXXXXX XXXXXXX XXXXXXX XXXXXXX Shorthand<div style="border:solid thin red;width:100px;">XXXXXXX</div> <div style="border:dashed thin red;width:100px;">XXXXXXX</div> <div style="border:solid thin red;width:100px;">XXXXXXX</div> <div style="border:solid medium red;width:100px;">XXXXXXX</div> <div style="border:solid thin red;width:100px;">XXXXXXX</div> <div style="border:solid thin blue;width:100px;">XXXXXXX</div> The results are: XXXXXXX XXXXXXX XXXXXXX XXXXXXX XXXXXXX XXXXXXX displayThis CSS attribute controls how an element is displayed on the web page. Note that there are many other values that you can apply to this CSS attribute, than those detailed here. But those other values are really only suited for advanced web programmers. But you can read about all of the values by clicking here if you wish. DEFAULT VALUE FOR DIV & DIV TYPE ELEMENTS: "block" DEFAULT VALUE FOR SPAN & SPAN TYPE ELEMENTS: "inline" "block"<div style="background-color:blue;width:100px;height:100px;display:block;">XXXXXXX</div> <div style="background-color:green;width:100px;height:100px;display:block;">XXXXXXX</div> <div style="background-color:red;width:100px;height:100px;display:block;">XXXXXXX</div> The results are: XXXXXXX
XXXXXXX
XXXXXXX
"none"<div style="background-color:blue;width:100px;height:100px;display:block;">XXXXXXX</div> <div style="background-color:green;width:100px;height:100px;display:none;">XXXXXXX</div> <div style="background-color:red;width:100px;height:100px;display:block;">XXXXXXX</div> The results are: XXXXXXX
XXXXXXX
Note, that if you specify "none" for the 'display' attribute, then the element disappears entirely from the web page. You can use this attribute to temporarily hide an element. "inline-block"<div style="background-color:blue;width:100px;height:100px;display:inline-block;">XXXXXXX</div> <div style="background-color:green;width:100px;height:100px;display:inline-block;">XXXXXXX</div> <div style="background-color:red;width:100px;height:100px;display:inline-block;">XXXXXXX</div> The results are: XXXXXXX
XXXXXXX
XXXXXXX
"inline"<div style="background-color:blue;width:100px;height:100px;display:inline;">XXXXXXX</div> <div style="background-color:green;width:100px;height:100px;display:inline;">XXXXXXX</div> <div style="background-color:red;width:100px;height:100px;display:inline;">XXXXXXX</div> The results are: XXXXXXX
XXXXXXX
XXXXXXX
Note, that if you specify that an element should be displayed 'inline' then you can no longer control its width and height. They are controlled exclusively by the elements' contents. Fontsfont-familyThere are several generic fonts that all web browsers are likely to have 'built in'. And you can read about them and the 'font-family' attribute by clicking here. However there are thousands of web fonts available from Google. Click here to browse through some of them. Each one provides you with the HTML code that you need to paste into your HTML web page in order to use them. <p style="font-family:Arial, Helvetica, sans-serif">Hello World</p> <p style="font-family:Cambria, Cochin, Georgia, Times, 'Times New Roman', serif">Hello World</p> <p style="font-family:'Courier New', Courier, monospace">Hello World</p> <p style="font-family:'Franklin Gothic Medium', 'Arial Narrow', Arial, sans-serif">Hello World</p> <p style="font-family:'Lucida Sans', 'Lucida Sans Regular', 'Lucida Grande', 'Lucida Sans Unicode', Geneva, Verdana, sans-serif">Hello World</p> <p style="font-family:Georgia, 'Times New Roman', Times, serif">Hello World</p> <p style="font-family:'Gill Sans', 'Gill Sans MT', Calibri, 'Trebuchet MS', sans-serif">Hello World</p> <p style="font-family:Impact, Haettenschweiler, 'Arial Narrow Bold', sans-serif">Hello World</p> And here are the results: Hello World Hello World Hello World Hello World Hello World Hello World Hello World Hello World font-weightThis attribute controls how thick the text appears. You can read more about it by clicking here. <p style="font-weight:normal">Hello World</p> <p style="font-weight:bold">Hello World</p> <p style="font-weight:100">Hello World</p> <p style="font-weight:200">Hello World</p> <p style="font-weight:300">Hello World</p> <p style="font-weight:400">Hello World</p> <p style="font-weight:500">Hello World</p> <p style="font-weight:600">Hello World</p> <p style="font-weight:700">Hello World</p> <p style="font-weight:800">Hello World</p> <p style="font-weight:900">Hello World</p> And here are the results: Hello World Hello World Hello World Hello World Hello World Hello World Hello World Hello World Hello World Hello World Hello World font-styleThis attribute controls the font style, e.g. nornal of italic. You can read more about it by clicking here. <p style="font-style:normal">Hello World</p> <p style="font-style:italic">Hello World</p> <p style="font-style:oblique">Hello World</p> And here are the results: Hello World Hello World Hello World font-sizeThis attribute controls the font size. You can read more about it by clicking here. <p style="font-size:xx-small;">Hello World</p> <p style="font-size:x-small;">Hello World</p> <p style="font-size:small;">Hello World</p> <p style="font-size:medium;">Hello World</p> <p style="font-size:large;">Hello World</p> <p style="font-size:x-large;">Hello World</p> <p style="font-size:xx-large;">Hello World</p> <p style="font-size:40px;">Hello World</p> <p style="font-size:60px;">Hello World</p> And here are the results: Hello World Hello World Hello World Hello World Hello World Hello World Hello World Hello World Hello World colorThis attribute sets the text color for any HTML element. You can read more about it here. <p style="color:red;">Hello World</p> <p style="color:green;">Hello World</p> <p style="color:blue;">Hello World</p> <p style="color:cyan";>Hello World</p> <p style="color:magenta;">Hello World</p> <p style="color:yellow;">Hello World</p> <p style="color:black;">Hello World</p> <p style="color:grey;">Hello World</p> And here are the results: Hello World Hello World Hello World Hello World Hello World Hello World Hello World Hello World position, left & topThese attributes are typically used in together to modify the position of an element on the screen. You can read more about this attribute by clicking here. The allowed values are thus: staticIf you specify this value then any 'top' and 'left' attributes you specify will be ignored. Click here to see an example. fixedIf you specify this value then any 'top' and 'left' attributes you specify will be relative to the web browser window. Click here to see an example. absoluteIf you specify this value then any 'top' and 'left' attributes you specify will be relative to the element's parent position. Click here to see an example. StickyIf you specify this value then any 'top' and 'left' attributes you specify will be relative to the user's scroll position. Click here to see an example. relativeIf you specify this value then you can specify either negative values for 'top' and 'left', which move the element up and to the left from its default position. Or positive values, which move the element down and to the right from its default position. Here is and example.
No change in default position of the second div. XXXXXX
XXXXXX
The second div is moved up and to the left by 20 pixels. XXXXXX
XXXXXX
The second div is moved down and to the right by 20 pixels. XXXXXX
XXXXXX
Alignmenttext-alignDEFAULT VALUE: "left" <div style="background-color:blue;color:white;margin:5px;width:200px;height:100px;">XXXXXX</div> <div style="background-color:blue;color:white;margin:5px;width:200px;height:100px;text-align:left;">XXXXXX</div> <div style="background-color:blue;color:white;margin:5px;width:200px;height:100px;text-align:center;">XXXXXX</div> <div style="background-color:blue;color:white;margin:5px;width:200px;height:100px;text-align:right;">XXXXXX</div> XXXXXX
XXXXXX
XXXXXX
XXXXXX
vertical-alignDEFAULT VALUE: "middle" If you are trying to align plain text inside a div, as in the example below, then you must also specify a value for the 'height' attribute greater than the height of the text. Otherwise 'vertical-align' will have no effect on the text. In this example the 'height' is 100 pixels. The 'verical-align' attribute has no effect at all on 'block' elements such as <div>. For 'inline-block' elements it controls the vertical alignment of the block itself, while text inside is unaffected. So I have used a table to demonstrate its effect. I know - it is confusing but CSS can be like hearding cats sometimes. <table border="1" cellpadding="0" cellspacing="0"> <tr> <td style="color:blue;">XXXX</td> <td style="color:blue;vertical-align:top;height:100px;">XXXX</td> <td style="color:blue;vertical-align:middle;height:100px;">XXXX</td> <td style="color:blue;vertical-align:bottom;height:100px;">XXXX</td> </tr> </table>
To force text to align inside block and inline-block elements you have to use other methods:
These examples represent simplest cases of using 'vertical-align', however there are other values you can use for this attribute. They are concerned with how text arranges itself vetically in relation to, for example, images in the middle of the text. You can read all about it and see other examples of its use by clicking here. Margins & PaddingMargins are the spacing between a given HTML element and those above and below, and those to the left and to the right. Padding is the space between the 4 margins of the HTML element and any of is contents. DEFAULT FOR MARGINS: 0px(pixels). DEFAULT FOR PADDING: 0px(pixels). You can read more about margins by clicking here and more about padding by clicking here. You can specify both padding and margins in 3 different ways:
No margins or padding<div style="display:inline-block;background-color:blue;color:white;width:200px;height:100px;">XXXXXX</div> <div style="display:inline-block;background-color:green;color:white;width:200px;height:100px;">XXXXXX</div> <div style="display:inline-block;background-color:red;color:white;width:200px;height:100px;">XXXXXX</div> <div style="display:inline-block;background-color:cyan;color:white;width:200px;height:100px;">XXXXXX</div> <div style="display:inline-block;background-color:purple;color:white;width:200px;height:100px;">XXXXXX</div> <div style="display:inline-block;background-color:magenta;color:white;width:200px;height:100px;">XXXXXX</div> <div style="display:inline-block;background-color:yellow;color:white;width:200px;height:100px;">XXXXXX</div> <div style="display:inline-block;background-color:navy;color:white;width:200px;height:100px;">XXXXXX</div> <div style="display:inline-block;background-color:maroon;color:white;width:200px;height:100px;">XXXXXX</div> XXXXXX
XXXXXX
XXXXXX XXXXXX
XXXXXX
XXXXXX XXXXXX
XXXXXX
XXXXXX
Margins at 40 pixels and no padding<div style="display:inline-block;background-color:blue;color:white;width:200px;height:100px;margin:40px;">XXXXXX</div> <div style="display:inline-block;background-color:green;color:white;width:200px;height:100px;margin:40px;">XXXXXX</div> <div style="display:inline-block;background-color:red;color:white;width:200px;height:100px;margin:40px;">XXXXXX</div> <div style="display:inline-block;background-color:cyan;color:white;width:200px;height:100px;margin:40px;">XXXXXX</div> <div style="display:inline-block;background-color:purple;color:white;width:200px;height:100px;margin:40px;">XXXXXX</div> <div style="display:inline-block;background-color:magenta;color:white;width:200px;height:100px;margin:40px;">XXXXXX</div> <div style="display:inline-block;background-color:yellow;color:white;width:200px;height:100px;margin:40px;">XXXXXX</div> <div style="display:inline-block;background-color:navy;color:white;width:200px;height:100px;margin:40px;">XXXXXX</div> <div style="display:inline-block;background-color:maroon;color:white;width:200px;height:100px;margin:40px;">XXXXXX</div> XXXXXX
XXXXXX
XXXXXX XXXXXX
XXXXXX
XXXXXX XXXXXX
XXXXXX
XXXXXX
Padding at 40 pixels and no margins<div style="display:inline-block;background-color:blue;color:white;width:200px;height:100px;padding:40px;">XXXXXX</div> <div style="display:inline-block;background-color:green;color:white;width:200px;height:100px;padding:40px;">XXXXXX</div> <div style="display:inline-block;background-color:red;color:white;width:200px;height:100px;padding:40px;">XXXXXX</div> <div style="display:inline-block;background-color:cyan;color:white;width:200px;height:100px;padding:40px;">XXXXXX</div> <div style="display:inline-block;background-color:purple;color:white;width:200px;height:100px;padding:40px;">XXXXXX</div> <div style="display:inline-block;background-color:magenta;color:white;width:200px;height:100px;padding:40px;">XXXXXX</div> <div style="display:inline-block;background-color:yellow;color:white;width:200px;height:100px;padding:40px;">XXXXXX</div> <div style="display:inline-block;background-color:navy;color:white;width:200px;height:100px;padding:40px;">XXXXXX</div> <div style="display:inline-block;background-color:maroon;color:white;width:200px;height:100px;padding:40px;">XXXXXX</div> XXXXXX
XXXXXX
XXXXXX XXXXXX
XXXXXX
XXXXXX XXXXXX
XXXXXX
XXXXXX
Note how the divs have been enlarged in order to accomodate the internal padding along all sides. OverflowAnother important CSS attribute is 'overflow'. Or in other words, what happens to the contents of a HTML element if it does not fit within the boundaries of the element. You can read more about this CSS attribute by clicking here. DEFAULT: visible. overflow: visible;<div style="display:block;background-color:black;color:white;width:400px;height:100px;overflow:visible;"> Lorem Ipsum is simply dummy text of the printing and typesetting industry. Lorem Ipsum has been the industry's standard dummy text ever since the 1500s, when an unknown printer took a galley of type and scrambled it to make a type specimen book. It has survived not only five centuries, but also the leap into electronic typesetting, remaining essentially unchanged. It was popularised in the 1960s with the release of Letraset sheets containing Lorem Ipsum passages, and more recently with desktop publishing software like Aldus PageMaker including versions of Lorem Ipsum.
Lorem Ipsum is simply dummy text of the printing and typesetting industry. Lorem Ipsum has been the industry's standard
dummy text ever since the 1500s, when an unknown printer took a galley of type and scrambled it to make a type specimen
book. It has survived not only five centuries, but also the leap into electronic typesetting, remaining essentially
unchanged. It was popularised in the 1960s with the release of Letraset sheets containing Lorem Ipsum passages, and more
recently with desktop publishing software like Aldus PageMaker including versions of Lorem Ipsum.
overflow: hidden;<div style="display:block;background-color:blue;color:black;width:400px;height:100px;overflow:hidden;"> Lorem Ipsum is simply dummy text of the printing and typesetting industry. Lorem Ipsum has been the industry's standard dummy text ever since the 1500s, when an unknown printer took a galley of type and scrambled it to make a type specimen book. It has survived not only five centuries, but also the leap into electronic typesetting, remaining essentially unchanged. It was popularised in the 1960s with the release of Letraset sheets containing Lorem Ipsum passages, and more recently with desktop publishing software like Aldus PageMaker including versions of Lorem Ipsum. </div> overflow: scroll;<div style="display:block;background-color:blue;color:black;width:400px;height:100px;overflow:scroll;"> Lorem Ipsum is simply dummy text of the printing and typesetting industry. Lorem Ipsum has been the industry's standard dummy text ever since the 1500s, when an unknown printer took a galley of type and scrambled it to make a type specimen book. It has survived not only five centuries, but also the leap into electronic typesetting, remaining essentially unchanged. It was popularised in the 1960s with the release of Letraset sheets containing Lorem Ipsum passages, and more recently with desktop publishing software like Aldus PageMaker including versions of Lorem Ipsum. </div>
Lorem Ipsum is simply dummy text of the printing and typesetting industry. Lorem Ipsum has been the industry's standard
dummy text ever since the 1500s, when an unknown printer took a galley of type and scrambled it to make a type specimen
book. It has survived not only five centuries, but also the leap into electronic typesetting, remaining essentially
unchanged. It was popularised in the 1960s with the release of Letraset sheets containing Lorem Ipsum passages, and more
recently with desktop publishing software like Aldus PageMaker including versions of Lorem Ipsum.
overflow: auto;<div style="display:block;background-color:blue;color:black;width:400px;height:100px;overflow:auto;"> Lorem Ipsum is simply dummy text </div>
Lorem Ipsum is simply dummy text
<div style="display:block;background-color:blue;color:black;width:400px;height:100px;overflow:auto;">
		Lorem Ipsum is simply dummy text of the printing and typesetting industry. Lorem Ipsum has been the industry's standard
		dummy text ever since the 1500s, when an unknown printer took a galley of type and scrambled it to make a type specimen
		book. It has survived not only five centuries, but also the leap into electronic typesetting, remaining essentially
		unchanged. It was popularised in the 1960s with the release of Letraset sheets containing Lorem Ipsum passages, and more
		recently with desktop publishing software like Aldus PageMaker including versions of Lorem Ipsum.
</div>
Lorem Ipsum is simply dummy text of the printing and typesetting industry. Lorem Ipsum has been the industry's standard
dummy text ever since the 1500s, when an unknown printer took a galley of type and scrambled it to make a type specimen
book. It has survived not only five centuries, but also the leap into electronic typesetting, remaining essentially
unchanged. It was popularised in the 1960s with the release of Letraset sheets containing Lorem Ipsum passages, and more
recently with desktop publishing software like Aldus PageMaker including versions of Lorem Ipsum.
Notice that, 'overflow' set on 'auto' the HTML element shows the scroll bar(s) only if the size of content exceeds the
size of HTML element.
Action selectorsThese are also reffered to as 'pseudo-classes'. Don't concern yourself with what that term means, just be aware that it is used interchangeably with 'action selectors'. There are MANY 'action selectors' and you can read all about them by clicking here. But the most frequently used on is the 'hover' selector. I.E. When the mouse cursor hovers within the boundaries of a HTML element. Let's explore some examples of its use. Change background color on mouse cursor hoverIn this example the div element will change its back ground color when the mouse cursor hovers over the top of it. HTML<div class="div2">XXXXX<div"> CSS between the style tags <style>...</style>
<style>
.div2
{
	background-color: navy;
	color: white;
	font-weight: bold;
}
.div2:hover
{
	background-color: blue;
	color: white;
	font-weight: bold;
}
</style>
XXXXXXXXX
Make an element disappear on mouse cursor hoverIn this example the div element will disappear when the mouse cursor hovers over the top of it.
HTML code
<div class="div3">XXXXX<div">

CSS between the style tags
<style>
	.div3
	{
	    background-color: navy;
	    color: white;
	    font-weight: bold;
	}
	.div3:hover
	{
	   /* This is a CSS comment and only HTML elements with class="div3" will disappear if the mouse cursor hovers over them. */
	   visabilty: hidden;
	}
</style>
XXXXXXXXX
Change the mouse cursor on hoverIn this example the mouse cursor changes when it hovers over the top of the div.
HTML code
<div class="div4">XXXXX<div">

CSS between the style tags.
<style>
.div4
{
	background-color: navy;
	color: white;
	font-weight: bold;
}
.div4:hover
{
   /* This is a CSS comment and the cursor will only change if the mouse cursor hovers over HTML
      elements with class="div4". */
   cursor: crosshairs;
}
</style>
XXXXXXXXX
The hover action selector can also be applied to:
Further learningThere are hundreds more CSS attributes than you can experiment with, and see what they do. Some attributes work on particular types of HTML elements but have no effect on others. The best way to learn about them is to experiment. You can learn about them through the CSS reference at W3 Schools. It includes a bunch of tutorials you can work your way through. And plenty of 'try it yourself' spaces where you can experiment with different values for each CSS attribute and see exactly how they effect the way the HTML appears in a web browser. Javascript for beginnersIntoductionJavaScript is the programming language of the web, and is supported by all major web browsers. It can calculate, manipulate and validate data. And it can change both HTML and CSS, and in so doing, generate dynamic HTML content that is responsive to user input The syntax rules and constructs of JavaScript very closely resemble those of the programming language C, with minor differences. This is not intended as a comprehensive tutorial on JavaScript. Rather the intention is to give you a general feel of the language, and detail some of its constructs. More comprehensive JavaScript tutorials are available here:
What is programming language?A programming language occupies a niche some where between plain English and binary computer language that consists only of 1's and 0's. Higher level programming languages, like C and JavaScript, are closer to the English end of the spectrum. While assmebly language is much closer to binary computer language. In the case of programming languages like C, your program must be compiled and linked into a '.exe' or executable file. These contain binary computer language instructions that allow the computer CPU to 'implement' your program. In the case of script language like JavaScript, your program remains permanently as human readable text, and the web browser converts it, one line at a time, to binary computer language. And passes each set of instrictions, in turn, onto the CPU to carry out and 'implement' your program. Reserved wordsIn JavaScript you cannot use these reserved words as variables, labels, or function names. Now this rule is VERY literal! The following function declaration will cause a JavaScript syntax error in a web browser:
	function if(arg1, arg2){...};

	However any of these function declarations are perfectly legal in JavaScript:

	function i_f(arg1, arg2){...};
	function _if(arg1, arg2){...};
	function if_(arg1, arg2){...};
	function If(arg1, arg2){...};
	function iF(arg1, arg2){...};
	function IF(arg1, arg2){...};
Data typesJavaScript has the following data types:
Literal valuesWe have seen some examples of literal values in the previous section. E.G. "Hello world", 10, 3.142, true and false. Variables explained
Another programming construct that needs to be explained is a
'variable'. You have come across this concept before when studying algebra in high school maths class, with linear
equations, e.g. y = 3x + 5. Choose a value for x and you can calculate a value for y, e.g. if x = 2 then
y = 2 * 2 + 5 = 9. The letter x is a variable and it is a place holder for some numeric value. You can think of it
as an empty box into which you can place a numeric value written down on a piece of paper.
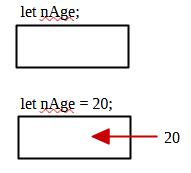
In reality a variable is a small chunk of the computer RAM or Random Access Memory. RAM as accessed via an integer
address, e.g. memory slot number 1038465843. But it would be rather inconvenient to have to use variables something
like this: Instead programing languages store '1038465843' against a variable name, nStudentNumber for example. It is so much easier to remember 'nStudentNumber', in your code, than '1038465843';
In JavaScript you must 'declare' your variables before you can use them else where, otherwise the web browser will
raise a syntax erroralong the lines of 'variable was not declared'. They keyword 'let' and 'var' are used for this
purpose, e.g. The 'var' keyword creates a 'God' variable that is said to have 'global' scope. You can use that variable ANYWHERE throughout your code and it does not matter where you declared it. The 'let' keyword on the other hand creates a limited variable that is said to have local scope. For example, if you creata a local variable with 'let' inside a function then you can only use that variable inside your function and no where else in your code. It is best practice to use 'let' most of the time and keep the use of 'var' to an absolute minimum, or preferably avoid uisng it at all.
You can decalre multiple variables with the same let or var statements like this:
One other thing that is important to note is that JavaScript is not a 'typed' language - you do not declare your
variables with a data type. And you can do all of the following without generating any JavaScript errors.
The programming language 'C' is very different - it is a strictly typed language when you declare variables you must
specifiy their data type: Statements In JavaScript the semi-colon (;) is like the full stop (.) in English. All JavaScript statements must end with a ;
or else you will get a JavaScript error. Here are some examples of statements: You can read more about JavaScript statements by clicking here. Expressions
Expressions are used as part of statements. Here are some examples:
If you put an epxression in your code like this: You can read more about JavaScript expressions by clicking here. OperatorsAssignment operators
Arithmetic operators
Comparison operatorsThese operators are used to make comparisons between values and always return a boolean value (either true/1 or false/0). From above x currently contains the value 0.
Logic operatorsThese operators are used to combine individual comparisons into a single boolean result. From above x currently contains the value 0.
Bitwise operatorsTo understand these operators you must first understand how to count in binary or base 2. We intuitively count in decimal, in which there a 10 digits: 0, 1, 2, 3, 4, 5, 6, 7, 8, 9. And we structure decimal or base 10 numbers with the following columns, and we start off with a 0 in the units colum and proceed to increment the digits until we reach 9 in the units column.
Now there is no single digit that represents the value 10, so we have to represent it using the available digits. What we do is to change the units column back to 0 and put a 1 in the tens column.
And we keep following this rule with the hundreds and thousands columns, and beyond. Computers are built up from a simple construct called a flipflop, made from 2 transtors. And a flipflop has only 2 possible states: on (representing the digit 1) and off (representing the digit 0). So therefore computers can ONLY count in binary or base 2. The rules for counting in binary are EXACTLY the same as those for counting in decimal, except that you have only 2 digits - 0 and 1. When a column reaches 2 we change it back to 0 and add a 1 to the column to the left.
Binary or base 2 is not the only counting system used in computer programming. Another very common counting system is hexadecimal or base 16. The digits (1 to 16) are 0, 1, 2, 3, 4, 5, 6, 7, 8, 9, A, B, C, D, E, F. And we follow the exact same rules but using an larger number of digits.
And you will also need to get your head around the truth tables for each of these bitwise operators. Truth tables traditionally use 1 and 0. But 1 also means true and 0 also means false. The truth tables combine single bits via the operators. A single bit is either a 0 or a 1. In the binary counting table above a 'bit' is the value (either 1 or 0) in one single column. The unit column, or the right most bit, is said to be the least signficant bit, while the 65535s column, or the left most column, is be the most signficant bit.
Now to use these bitwise operators on numbers that have more than one bit or column you simply line them up, one above the other right justified, e.g. 5 | 8
Any missing columns in either number you just fill in with 0s.
Then you just use the appropriate truth table above for each pair of bits in the same column.
Miscellaneous operators
ConstructsGrouped statementsYou can group more than one individual statements together, so that they behave like a single statement in the following constructs by using {(meaning begin grouped statements) and }(meaning end grouped statements). Here is an example:
let x = 0;
while (x < 10)
{
	document.write("x currently has the value of " + x + "<br/>");
	x++;/* Add 1 to x */
}
The loop will iterate 10 times and x will start of with the value 0 and end up with the value 9, before the loop terminates. So you would see the following output: x currently has the value of 0 x currently has the value of 1 x currently has the value of 2 x currently has the value of 3 x currently has the value of 4 x currently has the value of 5 x currently has the value of 6 x currently has the value of 7 x currently has the value of 8 x currently has the value of 9 Conditional statementsif, else if, elseYou can read more about if statements by clicking here and if/else if/else statements by clicking here. The if...else if...else statement tests one or more conditons, sequentially, and only executes the statement or statements for the condition that evaluates to true. If none of conditions are true then it executes the statement or statements for else clause (if present). Here are some varied examples:
let x = 10;
if (x == 10)
	document.write("x does equal 10!");
let x = 10;
if (x == 10)
	document.write("x does equal 10!");
else
	document.write("x does not equal 10!");
let x = 10;
if (x == 10)
	document.write("x does equal 10!");
else if (x == 9)
	document.write("x equal 9!");
else if (x == 8)
	document.write("x equal 8!");
else if (x == 7)
	document.write("x equal 7!");
else if (x == 6)
	document.write("x equal 6!");
else if (x == 5)
	document.write("x equal 5!");
else if (x == 4)
	document.write("x equal 4!");
else if (x == 3)
	document.write("x equal 3!");
else if (x == 2)
	document.write("x equal 2!");
else if (x == 1)
	document.write("x equal 1!");
else
	document.write("x does not equal 1, 2, 3, 4, 5, 6, 7, 8 or 9!");
switch/caseSwitch statements are useful for testing ordinal data types, such as integers. Here is an example:
let x = 10;
switch (x)
{
	case 1:
		document.write("x is equal to 1!");
		break;
	case 2:
		document.write("x is equal to 2!");
		break;
	case 3:
		document.write("x is equal to 3!");
		break;
	case 4:
		document.write("x is equal to 4!");
		break;
	case 5:
		document.write("x is equal to 5!");
		break;
	case 6:
		document.write("x is equal to 6!");
		break;
	case 7:
		document.write("x is equal to 7!");
		break;
	case 8:
		document.write("x is equal to 8!");
		break;
	case 9:
		document.write("x is equal to 9!");
		break;
	default:
		document.write("x is not equal to 1, 2, 3, 4, 5, 6, 7, 8 or 9!");
		break;
}
Ternary operatorThe ternary operator is a shorthand way of implementing simple if/else statement as an expression. Here is an example: let x = 10; document.write((x == 10) ? "x is equal to 10!" : "x is not equal to 10!"); Loopsfor loopYou use for loops when you know what the start condition is and when the end condition will be reached. You typically use for loops when iterating through an array which always have a known size. Here is an example:
	let arrayInts = {12, 34, 3, 567};
	for (let nI = 0; nI < arrayInts.length; nI++)
	{
		document.write("Array element number " + nI + " contains the value " + arrayInts[nI] + "!");
	}
while loopWhile loops will iterate 0 or more times. You use them when you:
	let x = 0;
	while (x < 10)
	{
		document.write("x currently has the value of " + x + "<br/>");
		x++;/* Add 1 to x */
	}
The loop will iterate 10 times and x will start of with the value 0 and end up with the value 10, after the loop terminates. So you would see the following output: x currently has the value of 0 x currently has the value of 1 x currently has the value of 2 x currently has the value of 3 x currently has the value of 4 x currently has the value of 5 x currently has the value of 6 x currently has the value of 7 x currently has the value of 8 x currently has the value of 9
	let x = 10;
	while (x < 10)
	{
		document.write("x currently has the value of " + x + "<br/>");
		x++;/* Add 1 to x */
	}
The loop will iterate 0 times and x starts with the value 10 and ends with the value 10 after the loop terminates. So you will see no output.
let x = 9;
while (x < 10)
{
The loop will iterate 1 time and x will start of with the value 9 and end up with the value 10, after the loop terminates. So you would see the following output:
x currently has the value of 9 do/while loopDo while loops iterate 1 or more times. You use them when you know that the loop must iterate at least once but you don't know how many times. Here is an example:
	let x = 5;
	do
	{
		document.write("x currently has the value of " + x + "!");
		x++; // Increment x
	}
	while (x < 10);
You will see the following output: x currently has the value of 5! x currently has the value of 6! x currently has the value of 5! x currently has the value of 7! x currently has the value of 8! x currently has the value of 9! x currently has the value of 10! Note that, with a do/while loop, you see x with the value of 10. Where as with the while/do loop you do not. Execution controlbreakYou can read more about 'break' by clicking here. This is used in switch statements like this example:
let x = 10;
switch (x)
{
	case 1:
		document.write("x is equal to 1!");
		break;
	case 2:
		document.write("x is equal to 2!");
		break;
	case 3:
		document.write("x is equal to 3!");
		break;
	case 4:
		document.write("x is equal to 4!");
		break;
	case 5:
		document.write("x is equal to 5!");
		break;
	case 6:
		document.write("x is equal to 6!");
		break;
	case 7:
		document.write("x is equal to 7!");
		break;
	case 8:
		document.write("x is equal to 8!");
		break;
	case 9:
		document.write("x is equal to 9!");
		break;
	default:
		document.write("x is not equal to 1, 2, 3, 4, 5, 6, 7, 8 or 9!");
		break;
}
If you don't include them then more than the next case statement will be executed for no good reason. It can also be used in loops as in this example:
	let x = 10;
	while (true) // This loop will execute forever.
	{
		if (x == 10)
				break; // But this if / break statement will terminate the loop.
		document.write("x currently has the value " + x + "!");
		x++; // Increment x
	}
continueYou can read more about 'contine' by clicking here. This cause the CPU to skip back to the top of the loop without executing any of the statements below it. Here is an example.
let x = 0;
while (x < 10) You will see the following output:
x currently has the value 0 returnYou can read more about 'return' by clicking here. This cause the currently executing function to terminate and return to the caller of that function. Here is an example:
function CalculateAverage(nVal1, nVal2, nVal3, nVal4)
{
	return (nVal1 + nVal2 + nVal3 + nVal4) / 4;
}
document.write("The average of 3, 6, 78 and 34 is " + CalculateAverage(3, 6, 78, 34));
You can use return at any point in your function and you don't have to combine it with a return value. You can just do return; throw & catchYou can read more about 'throw' by clicking here.
function myFunction()
{
	let x = document.getElementById("demo").value;
	try
	{
		if (x == "")
			throw "Contents of element with ID 'demo' is empty!";
		else if (isNaN(x))
			throw "Contents of element with ID 'demo' is not a number";
		else if (x > 10)
			throw "Contents of element with ID 'demo' is too high";
		else if (x < 5)
			throw "Contents of element with ID 'demo' is too low";
	}
	catch(strError)
	{
		document.write(strError);
	}
}
Defining and calling functionsA function is a reusable block of code designed to perform a specific task, which executes when it is "called" or "invoked". It saves you having to repeat and debug that particular segment of code in 100s of places throught your program. Or in simpler terms, it saves you a considerable amount of repeated typing. In JavaScript you define a function like this:
function FunctionName(<Optional parameter1>, <Optional parameter2>, ... , <Optional parameterN>)
{
	<Statement 1>
	<Statement 2>
	.
	.
	.
	<Statement N>
}
You can use a 'return' statement at any point in the function. This can include an optional value to return, e.g. return (Optional parameter1 + Optional parameter2 + ... Optional parameterN)/ N; Here is a specific example of a function that returns a value, with JavaScript comments to explain it.
function CalculateAverage(arrayValueList)
{
	let nTotal = 0;

	if (typeof arrayValueList != Array) // Make sure the parameter is actually an array object
		return "ERROR: Parameter arrayValueList is not an array!"; // The parameter is not an array so we can't calculate an average so abort the function.
	else
	{
		for (let nI = 0; nI < arrayValueList.length; nI++)
		{
			if (arrayValueList[nI].isFinite()) // Check if the next array element is a number.
				nTotal += arrayValueList[nI]; // The next array element is a number so add it to the total.
			else
				return "arrayValueList[" + nI + "] is not a number (" + arrayValueList[nI] + ")!"; // The next array element is not a number so we can't calculate an average so abort the function.
		}
	}
	return "The average is " + (nTotal / arrayValueList.length).toString(); // Return the average value of all the values in the array.
}
And you invoke and call the function like this:
let arrayValueList = {10, 34, 56, 78 , 98, 35, 54, 71, 43, 120};
alert(CalculateAverage(arrayValueList));// It will either display an error message or the average of all the values in the array.
Here is an example of a function that does not return an value.
function DisplayErrorMessage(strMessage)
{
	document.write("#######################################################<br/>\n");
	document.write("#######################################################<br/>\n");
	document.write("#######################################################<br/>\n");
	document.write("### AN ERROR HAS OCCURED                            ###<br/>\n");
	document.write("###                                                 ###<br/>\n");
	document.write("### " + strMessage                                  ###<br/>\n");
	document.write("###                                                 ###<br/>\n");
	document.write("#######################################################<br/>\n");
	document.write("#######################################################<br/>\n");
	document.write("#######################################################<br/>\n");
}
And you invoke and call the function like this:
DisplayErrorMessage("Value is not an number!");
You can read more about JavaScript functions by clicking here. String manipulationUsing operatorsYou can read more about string manipulation via operators by clicking here. You can use the assignment operators and the + operator on strings. All these string manipulations are permissable: let str1 = "ABC", str2 = "DEF", str3 = ""; str3 = str1 + str2; // str3 now contains the string "ABCDEF" str3 += str1; // str3 now contains the string "ABCDEFABC" You can also use all the arithetic comparison operators with strings too. The comparisons are alphabetic, once character at a time. All these string manipulations are permissable: let str1 = "ABC", str2 = "DEF", bResult = false; bResult = str1 > str2; // bResult contains false because "ABC" is not alphabetically greater than "DEF" bResult = str1 < str2 // bResult now contains false because "ABC" is not alphabetically less than "DEF" bResult = str1 >= str2; bResult = str1 <= str2; bResult = str1 == str2; String methodsYou can read more about string functions by clicking here. Here is the full list of available string functions availabe to you. NOTE: that none of these funcion modify the original string that they are called on.
Miscellaneous useful functionsYou can read more about these functions by clicking here. Only the functions you are most likely to use are listed here.
Object Orinted Programming or OOPOOP involves self contained objects that contain a set of attributes and a set of functions. You are very familiar with this concept even though this description might seem, at face value, to be very alien to you. And therefore this method of programming makes it very much easier to do. Consider a person such as yourself. A 'person' is a generic object that contains a bunch of common attributes that are the same for all people. E.G.
A person also has a bunch of attributes that are not fixed. E.G.
So let's convert this concept to a JavaScript 'class'. A 'class' in OOP is like a set of instructions in a Ikea flat pack book shelf. The instructions are not the book shelf itself, merely describe the way you construct the book shelf. In JavaScript you need to implement a special initialisation function called a 'constructor'. You can think of yourself as a 'constructor' function as you read the Ikea instructions and put your bookshelf together.
class CPerson
{
	constructor(strHairLength, strHairType, strEyeColor, nHeight, nWeight, strName, nAge)
	{
		this.m_nNumberOfLegs = 2;
		this.m_nNumberOfArms = 2;
		this.m_nNumberOfEyes = 2;
		this.m_nNumberOfArms = 2;
		this.m_nNumberOfFingers = 10;
		this.m_nNumberOfToes = 10;
		this.m_strHairLength = strHairLength;
		this.m_strHairType = strHairType;
		this.m_strEyeColour = strEyeColor;
		this.m_nHeight = nHeight;
		this.m_nWeight = nWeight;
		this.m_strName = strName;
		this.m_nAge = nAge;
	}
}
Hungarian notation variable naming conventionI am using a very specific naming convention here called 'Hungarian notation'. And the specific Microsoft Foundation Class variant of it. Let's take 'm_nNumberOfLegs' as an example: 'm_' is short for 'member of class CPerson' (as opposed to a stand alone variable that you would instead name 'nNumberOfLegs'. The 'n' is short for integer and 'NumberOfLegs' describes the purpose of the attribute. So briefly...
Data type and member indicators, i.e. str, n, f and m_ should ALWAYS be lower case. And you should capitalise the first letter of your variable name, and choose a name that intuitively describes the purpose of your variable. Following a naming convention does not really matter for a few lines of JavaScript code with a few variables. But it makes a BIG difference when you have hundreds of lines of JavaScript code spread across more than one file. Classes explainedLet's also look at 'CPerson': 'C' denotes that CPerson is the class definition, equivalent to the Ikea instructions. 'Person' would be an instance of class CPerson and equivalent to the physical book shelf. You can read more about 'Hungarian notation by clicking here. 'this' explainedThe word 'this' ia pre-defined word in JavaScript that, in this context, refers to the class CPerson. So you use it to bring your class attributes or member variables into existence. Asking why you create class member variables by means of 'this' and is there anything deeper to understand are pointless questions. You may as well ask why is the engine of a car always at the front and why is the petrol tank spout always at the rear left of your car. The answer to both questions is because that is the way the engineers arbitrarily decided to design cars! And similarly for JavaScript, you use 'this' because that is the way that the inventors of JavaScript arbiitraily decided to design JavaScript. Just go with it ;-) Constructor function explained
Notice that the constructor function has 7 parameters through which one passes in values for those class
attributes that have no fixed values. So, JavaScript, you would create a specific instance of a person, or a
person object, by doing the following Class inherritance explainedNow let's extend class CPerson to describe an actual person. In programing we call this 'inheritance'.
class CPoliceOfficer extends CPerson
{
	constructor(strHairLength, strHairType, strEyeColor, nHeight, nWeight, strName, nAge, strBadgeNumber, strAssignedSataion, strTitle)
	{
		super("short", "straight", "blue", 184, 98, "Greg", 60);
		this.m_strBadgeNumber = strBadgeNumber;
		this.m_strAssignedSataion = strAssignedSataion;
		this.m_strTitle = strTitle;
	}
}
So you would create a specific instance of a police officer, or a police officer object, by doing the following Class methods or functions explainedWe can also define methods or functions for our classs. E.G.
class CPerson
{
	constructor(strHairLength, strHairType, strEyeColor, nHeight, nWeight, strName, nAge)
	{
		this.m_nNumberOfLegs = 2;
		this.m_nNumberOfArms = 2;
		this.m_nNumberOfEyes = 2;
		this.m_nNumberOfArms = 2;
		this.m_nNumberOfFingers = 10;
		this.m_nNumberOfToes = 10;
		this.m_strHairLength = strHairLength;
		this.m_strHairType = strHairType;
		this.m_strEyeColour = strEyeColor;
		this.m_nHeight = nHeight;
		this.m_nWeight = nWeight;
		this.m_strName = strName;
		this.m_nAge = nAge;
	}

	DoWalk(nHowManyMeters, nCompasBearing)
	{
		.....
	}

	DoPayABill(strBillerName, nBillamount)
	{
		.....
	}
}
And we can invoke those methods like this: JavaScript comments
/*meters*/ is one way you can create code plain English comments in JavaScript. Any text between the comment markers
is ignored by the web browser. The other way is to use: Pre-dfined JavaScript ObjectsThere are a number of pre-defined 'objects that you have access to in JavaScript. They are vry much bigger and more complicated than the above very simple examples. But the general idea is the same. windowYou can read about the full range of functions and attributes by clicking here. The full list of methods and properties are not detailed here, just a subset that is frequently used in this website. PropertiesThese properties are avialable to you without invoking the window object, e.g. you don't necessarily need to type 'window.console', instead your can just type 'console'.
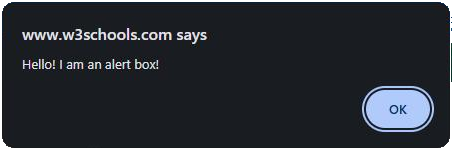
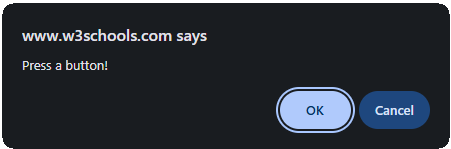
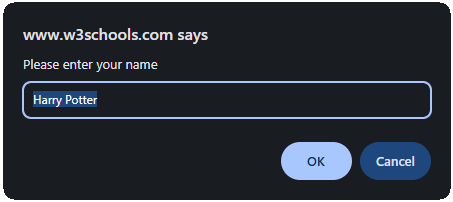
MethodsAgain these properties are avialable to you without invoking the window object, e.g. you don't necessarily need to type 'window.alert("Message");', instead your can just type 'alert("Message");'.
documentTo read more about the document object by clicking here. Your entire HTML document (.html or .htm file) is read by the web browser and turned into an 'object' that you then have access to in JavaScript. It is called 'document' (case sensitive). So let's have a llok at some of the items you can find and change in the JavaScript object 'document'. Atributes or member variablesThis is just a few of the attributes available to you. You can learn about the many other by clicking the above link.
Methods or member functionsThe 'document' object also contains a bunch of useful functions that you can use and these are the most frequently used ones in this website:
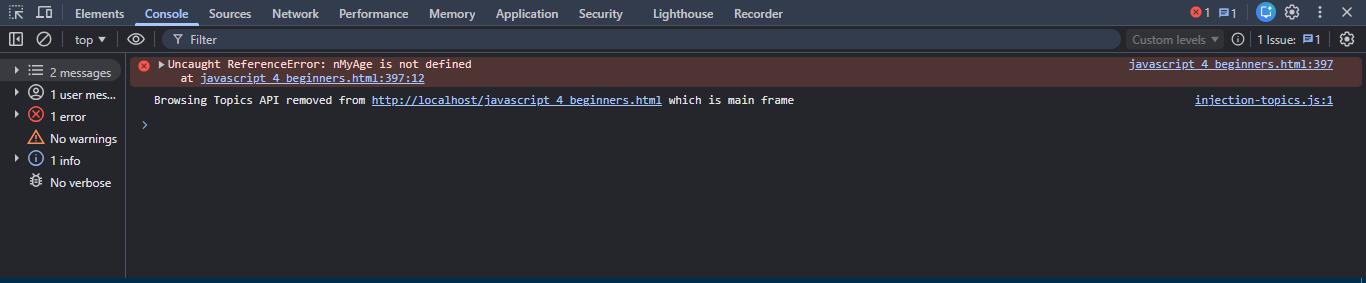
consoleYou can read more about the console object by clicking here.
The console is one of the tabs in a web browser's 'developer tools' and you can access it in Chrome by pressing
F12. You can use it as a debugging tool for your JavaScript code but you can also use it to find and fix JavaScript
syntax errors by clicking the hyperlinks in the error messages. You source code will appear with the line of code that
caused the syntax error clearly highlighted. As for debugging these are some of the useful functions you can use to output variable values and other useful information that helps you to find parts of your code that are not working as you expected.
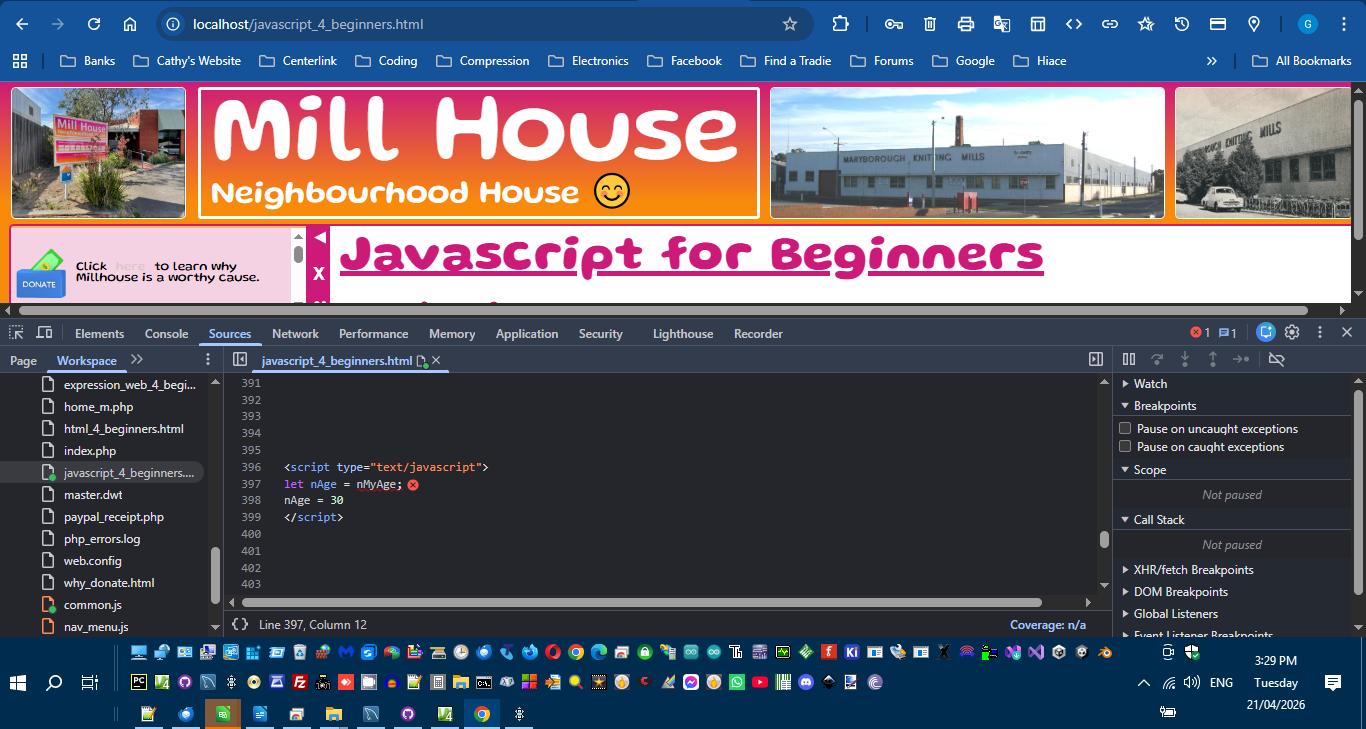
Using the console tab to fix JavaScript syntax errorsThe web browser will step through your HTML and JavaScript code one line at a time. If it encounters an error in
your JavaScript code then the web browser just stops rendering your web page completely. You may find parts of your
web page hugely distorted or entirely missing. This is the tell take sign that you have an error in your JavaScript
code. So how do you find it? In Chrome you simply hit F12 and the developer tools window will appear at the bottom
or the right side of the web browser window. You can drag this window with the mouse cursor to re-position it and
resize it. Notice the tabs along the top edge: 'Elements', 'Console', 'sources', 'Network',... Click the 'Console'
tab. Any JavaScript errors will be displayed here.
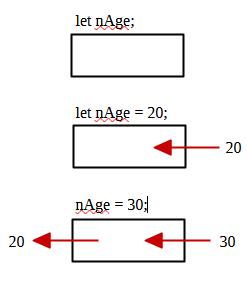
<script type="text/javascript">
        let nMyAge = 0;
        let nAge = nMyAge;
        nAge = 30;
</script>
HOWEVER keep in mind that, if your original web page contains any PHP code, then that PHP code will have been removed by the web server before sending the web page to your web browser. So the line number above may not match the line number in your original web page in Expression Web (that DOES contain the PHP code). screenYou can read more about the screen object by clicking here.
locationYou can read more about the screen object by clicking here.
localStorageYou can read more about the localStorage object by clicking here.
This is a place you can permantently store JavaScript data that you need for your web page. The data will
be available for the specific web page even if the user closes the web browser and opens it and your web page
a few days later. You have to explicity remove any data your store in the localStorage object. You store your
data as key/value pairs.E.G. Values you store in localStorage remain even if the user refreshes the web page, where as the value of all your global JavaScript variables will be lost. sessionStorageYou can read more about sessionStorage object by clicking here.
This is a place you can temprarily store JavaScript data that you need for your web page. The data will be available
for the specific web page as long as the user does not close the web browser or the tab. You store your data as
key/value pairs.E.G. Values you store in sessionStorage remain even if the user refreshes the web page, where as the value of all your global JavaScript variables will be lost. MathYou can read more about the Math object constant and functions by clicking here. Constants
FunctionsThese functions return NaN (not a number) if x is not a number.
MS Expression Web for beginnersIntroductionIt is important to know that MS Expression Web is not industry standard web editing software. You could not use it to edit complex coporate web sites. However for much simpler not for profit organisationsm small business and personal web sites it is STILL excellent web editing software. Microsoft 'retired' it is about 2012 and it is now FREE to use. Itdoes use an earlier verion of HTML, while modern web browsers now use the version 5 standard. However this does not present a signficant problem when editing simple web pages and site, and you can easily work around this limitation. And Expression Web has features, that make editing an entire web site really quick and easy, that are just not available in paid & licensed web editing software. You can download it from here. Dynamic Web Template SystemThe is one of the unique features of MS Expression Web that makes editing an entire web so easy. The other feature is the 'site wizard' that creates an entire functioning web site, based on the template you select, with a few clicks of your mouse. In the process of creating your new web site MS Expression Web create a template file named 'master.dwt'. Now all the other web pages in your web site are 'built' from that template file. It is a similar idea to MS Word's document templates (.dot files). The file master.dwt sets out the editable and non-editable parts of your web pages. So, by editing this one special file, you can change the colour scheme and layout of ALL the other web pages. MS Expression Web will ask you if you want to update them all whenever you make changes to master.dwt. MS Expression Web uses HTML comments <!-- ... -> to mark out different regions of your
web pages. And web browsers ignore HTML comments. So this is what master.dwt looks like when open
in Expression Web. This is what a web page, that is built from master.dwt, looks like when opened in Expression Web. Also notice the the bit around "Insert content here" with the white text background. That is the part of the web page that master.dwt marks as editable and should contain content that is specific for this web page. You can type freely in this part of the web page, save your changes and Expression Web will not complain. Also notice that you have a windows file explorer like construct that allows you to see and browser through
all the files and folders that make up the entire web site. You can also create new folders and files by right
clicking in here. For example, if you want to create a new web page based on master.dwt, then right click
on that file and select 'New from Dynamic Web Template'. Editing HTML TagsAs you edit your HTML tags Expression Web will display context sensitive popup menus that list all the option avilable to you. But remember that Expression Web uses an earlier verion of HTML than what modern web browsers use. So these popup will not show you any options that are part of HTML version 5 only. So just keep that at the back of your mind. List of tag namesAs soon as you type '<' You will see this popup menu: The type a space and you will see this popup menu: This is a rather convenient way for you to get to know the tag names and the different properties that you can apply to them. Editing CSSIf you add a 'style' property to one of your HTML elements then Expression Web will show you
this popup menu. E.G. <img style="|", with the cursor sitting between the double quotes.
This also works when typing between the <style>...</style> tags.< br/>
Again this a is a really convenient way to get to know many of the CSS attributes you can play around with, and the valid values that can be applied to them. Syntax error highlightingAnother really useful feature of Expression Web is that it highlights syntax errors in
both your HTML tags and your CSS. For example: Now in this example I have partially closed the <p> tag but I have neglected to add the
closing angle bracket to my </p tag. Now notice the yellow text backround highlighting in two
places. Code, Split & Design TabsThese are located at the bottom left of the editing window. The 'design' tab shows you a
rough rendering of your web page as it would appear in a web browser. But it is imperfect
and there may be inconsistencies between how you page appears here and how it appears in your
web browser. But that is not all you can do in this tab. You can actually edit the content in much the same way as you edit a Word document. You can add new paragraphs, hyperlinks, page bookmarks and images. Just explore the 'Insert' popup menu. And you can also change text characteristics (bold, italic and underlined), create bulleted and numbered lists and change text alignment (left, center and right). Just explore the toolbar at the top of the editing window. And then switch to the code tab to see what tags and properties have been added. Again a convenient way to get to know the tags and properties. The slit view shows you both the HTML code and the rendering at the same time. If you want to view your web page in a web browser then locate it in the file explorer on the
left hand side, right click, select 'Open with' and then click on your web browser in the list.
Your web page will then open in the web browser. Renaming files and foldersAnother incredibly useful feature of Expression Web is, if you rename your HTML documents, your image file names or even your folders then Expression Web will search through ALL the HTML files, linked to master.dwt, find all the hyperlinks to them or involving them and change the values of their href properties accordingly. But you have to do this within Expression Web and not in Windows file explorer. ConclusionMS Expression Web may, deprecated software since 2012 however, with all these VERY helpful features, I have not found its match among even paid & and licensed web editing software over the last 10 years or so. And it is toally FREE to use now. |
|||||||||||||||||||||||||||||||||||||||||||||||||||||||||||||||||||||||||||||||||||||||||||||||||||||||||||||||||||||||||||||||||||||||||||||||||||||||||||||||||||||||||||||||||||||||||||||||||||||||||||||||||||||||||||||||||||||||||||||||||||||||||||||||||||||||||||||||||||||||||||||||||||||||||||||||||||||||||||||||||||||||||||||||||||||||||||||||||||||||||||||||||||||||||||||||||||||||||||||||||||||||||||||||||||||||||||||||||||||||||||||||||||||||||||||||||||||||||||||||||||||||||||||||||||||||||||||||||||||||||||||||||||||||||||||||||||||||||||||||||||||||||||||||||||||||||||||||||||||||||||||||||||||||||||||||||||||||||||||||||||||||||||||||||||||||||||||||||||||||||||||||||||||||||||||||||||||||||||||||||||||||||||||||||||||||||||||||||||||||||||||||||||||||||||||||||||||||||||||||||||||||||||||||||||||||||||||||||||||||||||||||||||||||||||||||||||||||||||||||||||||||||||||||||||||||||||||||||||||||||||||||||||||||||||||||||||||||||||||||||||||||||||||||||||||||||||||||||||||||
|
|
|||||||||||||||||||||||||||||||||||||||||||||||||||||||||||||||||||||||||||||||||||||||||||||||||||||||||||||||||||||||||||||||||||||||||||||||||||||||||||||||||||||||||||||||||||||||||||||||||||||||||||||||||||||||||||||||||||||||||||||||||||||||||||||||||||||||||||||||||||||||||||||||||||||||||||||||||||||||||||||||||||||||||||||||||||||||||||||||||||||||||||||||||||||||||||||||||||||||||||||||||||||||||||||||||||||||||||||||||||||||||||||||||||||||||||||||||||||||||||||||||||||||||||||||||||||||||||||||||||||||||||||||||||||||||||||||||||||||||||||||||||||||||||||||||||||||||||||||||||||||||||||||||||||||||||||||||||||||||||||||||||||||||||||||||||||||||||||||||||||||||||||||||||||||||||||||||||||||||||||||||||||||||||||||||||||||||||||||||||||||||||||||||||||||||||||||||||||||||||||||||||||||||||||||||||||||||||||||||||||||||||||||||||||||||||||||||||||||||||||||||||||||||||||||||||||||||||||||||||||||||||||||||||||||||||||||||||||||||||||||||||||||||||||||||||||||||||||||||||||||